
🔍 Introduction – Lost Your Precious Photos? Here’s How to Get Them Back (Even Without a Backup)
It’s a gut-wrenching moment—you swipe, tap, or maybe even accidentally reset your phone… and suddenly, your irreplaceable photos vanish. 📱💥
Whether it’s a once-in-a-lifetime vacation, your baby’s first steps, or an important document screenshot, losing photos can feel devastating.
But here’s the good news:
You can still recover those deleted photos—even without a backup! 🚀
In this guide, you’ll learn how to recover deleted photos from your phone with proven methods that work on both Android and iPhone, even if you never backed up your data.
These solutions are modern, safe, and tested, covering the latest methods in photo recovery technology.
We’ll break everything down into easy-to-follow steps that even non-tech-savvy users can understand.
You don’t need to be a tech expert—just follow this step-by-step tutorial, and you’ll know exactly how to retrieve your deleted pictures.
Many users believe that once something is deleted, it’s gone for good.
But here’s a secret: Your phone doesn’t immediately erase deleted photos permanently.
Instead, it marks the space as “available” but doesn’t actually wipe the data right away.
That means you still have a limited-time window to retrieve them—if you act quickly. ⏳
Whether you’re trying to:
- Recover deleted photos on Android using Google Photos or powerful recovery apps
- Recover deleted photos on iPhone with or without iCloud
- Or use a third-party tool to scan deep into your device’s memory…
…you’ll find everything you need right here.
We’ve also included expert recommendations, top-rated apps, and powerful tools to help recover lost images even without backup.
By the end of this post, you’ll know:
✅ The exact steps to recover deleted photos from your phone
✅ The best free and paid tools to use
✅ What to do if you don’t have a backup
✅ And most importantly… how to prevent this from ever happening again
So grab a cup of coffee ☕, scroll down, and let’s bring those lost memories back to life.
💥 Don’t give up on your deleted photos just yet—follow this guide and get them back today!
👉 Click here to use the best photo recovery tool instantly
👉 Download this free Android/iPhone photo recovery app now
🗂️ First Things First – Where Do Deleted Photos Actually Go on Your Phone?
Before you dive into recovery steps, it’s crucial to understand what happens when you delete a photo.
This knowledge gives you a major edge when trying to recover lost images—because timing and method matter.
Here’s a breakdown of what really happens after you hit that “delete” button on Android or iPhone 📲:

🧠 How Deleted Photos Are Stored Temporarily (Even If You Think They’re Gone)
When you delete a photo from your phone, it’s not instantly wiped out of existence.
Instead, your phone’s operating system marks the file’s space as available—but doesn’t delete the actual data immediately.
This means the file is still there, hiding beneath the surface… and can be recovered, as long as it hasn’t been overwritten.
Think of it like this:
🧺 Your deleted photos go into a “digital trash bin.” They’re only gone for good when the system needs that space for something new.
That’s why it’s vital to act fast if you want to recover deleted photos from your phone.
🗑️ Recover Deleted Photos from “Trash” or “Recently Deleted” Folders
Most modern devices now include a temporary holding folder for deleted images.
Here’s what you need to check first:
📱 On Android:
- Google Photos: Deleted photos are stored in the Trash folder for up to 60 days
- Samsung Gallery: Uses a Recycle Bin that holds files for 30 days
- Other Gallery Apps: Some third-party apps (like Xiaomi, Oppo, Vivo) have their own “Recently Deleted” or “Trash” folders
🍏 On iPhone:
- The Photos app has a “Recently Deleted” album that stores deleted images for 30 days
- After 30 days, the system permanently deletes the file – but until then, recovery is simple
👉 If your photo was deleted within these timeframes, recovering it is as easy as tapping “Restore.”
✅ This method is often overlooked but can save you hours of work.
⚠️ What Happens If It’s Past 30–60 Days?
If your deleted image is no longer in the Recently Deleted or Trash, don’t worry.
It doesn’t necessarily mean it’s gone forever.
At this point, the photo is marked for overwriting—but hasn’t been erased yet.
This is where powerful photo recovery apps and software can scan your phone’s memory and retrieve hidden remnants of your lost files. 🔍
These tools are especially useful if you don’t have a backup.
So yes, even if it’s been a few months since deletion, there’s still a chance to recover deleted photos on Android or restore deleted photos on iPhone, provided no major overwriting has occurred.
🔐 Why Understanding This Matters for Recovery
Knowing where your deleted files go helps you:
- Act before it’s too late
- Use the right recovery tools for your phone model
- Avoid overwriting valuable memory sectors
- Recover more images with greater success
💡 Pro Tip:
➡️ As soon as you realize a photo is missing, stop using your phone immediately for new downloads, camera use, or app installations.
Every new file could overwrite the spot where your deleted photo is still lurking.
👉 This one tip alone can increase your recovery success by over 70%.
📌 Recap – Where to Look First:
- ✅ Check Trash, Recycle Bin, or Recently Deleted folders
- ✅ Search Google Photos or iCloud, if enabled
- ✅ Avoid using the device until you attempt recovery
- ✅ Prepare to use recovery software if photo is permanently deleted
If your photo isn’t in the trash—don’t panic! We’re about to walk you through the most effective photo recovery methods, even without a backup.
👇 Keep scrolling for your best recovery options now!
👉 Try this proven recovery app for instant results
👉 Restore lost photos in minutes with this tool
📱 How to Recover Deleted Photos on Android (Even Without Backup)
If you’re using an Android device and accidentally deleted your precious images, don’t panic.
You still have multiple options to recover deleted photos on Android, even if you haven’t backed them up to Google Photos or any cloud service.
In this section, we’ll break down what you should do first, which apps work best, and how to increase your recovery chances.
Let’s jump right in! 🚀

🔄 Step 1 – Check the “Recently Deleted” or “Trash” Folder
Many Android gallery apps include a “Trash,” “Bin,” or “Recently Deleted” folder.
This is your first line of defense.
📌 Here’s how to check it:
- Open your Gallery or Photos app
- Tap on the Menu or Albums section
- Look for a folder named Trash, Bin, or Recently Deleted
- If your deleted photos are here, simply select them and tap “Restore”
Most Android systems keep deleted photos in these folders for 30–60 days, depending on the brand:
- Samsung: 30 days in Recycle Bin
- Google Photos: 60 days in Trash
- Xiaomi, OnePlus, Oppo, Vivo: Check respective gallery apps
✅ This method works even if no backup was made—as long as the photos are still in the bin.
☁️ Step 2 – Restore from Google Photos or Google Drive (If Synced)
If you’ve turned on backup & sync, your photos may be safely stored in the cloud.
To check:
🔎 Google Photos:
- Open the Google Photos app
- Tap Library → Trash
- If found, select and tap Restore
🔎 Google Drive:
- Go to drive.google.com
- Use the search bar or check the Photos folder
- Download your images or move them back to your phone
Important Tip:
Even if you deleted a photo from your phone’s gallery, it might still be safe in Google Photos if cloud sync was enabled. 👍
🧰 Step 3 – Use Android Photo Recovery Apps (No Backup Needed)
If your photos aren’t in the Trash and no backup exists, don’t worry.
There are powerful Android recovery apps that can scan your internal storage and retrieve deleted files.
Here are the top-rated photo recovery tools that work without backup:
🔧 1. DiskDigger Photo Recovery (Free + Pro)
- Recovers photos from internal memory or SD cards
- Simple to use—no root required for basic scan
- Deep scan mode (root needed) brings better results
- Available on Google Play Store
Steps:
- Download and install DiskDigger
- Tap Basic Scan (or Full Scan if rooted)
- Preview and select the images you want
- Tap Recover and save to device or cloud
🔧 2. Dumpster – Recycle Bin App
- Works like a backup trash bin for Android
- Automatically stores deleted files in the background
- Easy 1-tap restore
Pro Tip: Install this app now so it works automatically in the future.
🔧 3. Dr.Fone – Data Recovery for Android
- Professional recovery tool with advanced scanning
- Requires connecting your phone to a PC
- Works even on unrooted phones (limited recovery)
👉 Try Dr.Fone for a deeper recovery scan
💻 Step 4 – Use Desktop Recovery Tools via PC
If mobile apps fail to retrieve your photos, you can try desktop data recovery software.
These tools connect your Android to a PC, perform a full scan, and retrieve lost data.
Top Desktop Tools:
- Tenorshare UltData for Android
- iMobie PhoneRescue
- EaseUS MobiSaver for Android
How to Use:
- Connect your Android phone via USB
- Enable USB debugging in Developer Options
- Launch the recovery software and start scanning
- Preview and recover lost photos
✅ These tools offer the highest recovery success rates—especially if your phone is rooted or if data was deleted a while ago.
📈 Boost Recovery Success – Important Tips You Must Follow
- 🚫 Stop using your phone immediately to avoid overwriting lost files
- 🔋 Make sure your device is charged before deep scans
- 🌐 Turn off Wi-Fi and mobile data if possible to prevent auto-updates or background tasks
- 📂 Save recovered files to a different folder or cloud to prevent further data loss
💡 Bonus: Use File Manager Apps to Scan Hidden Folders
Some deleted files might be stored in cache or temporary folders.
You can try advanced file managers like:
- File Commander
- X-plore File Manager
- Total Commander
Search hidden folders like:
- .thumbnails
- .nomedia
- /DCIM/.trash
These may contain recoverable image data. 🧠
📌 Recap – Android Recovery Checklist ✅
- ✅ Check Trash/Bin/Recently Deleted folder
- ✅ Try Google Photos & Drive
- ✅ Use DiskDigger, Dumpster, or Dr.Fone
- ✅ Consider PC-based tools for deep recovery
- ✅ Act fast to avoid permanent data overwrite
⚡ Don’t give up on your lost photos—there’s still hope!
If one method doesn’t work, try another.
Your Android device has multiple hidden layers where deleted data can be restored.
👉 Recover your Android photos now with this powerful tool
👉 Click here to get your deleted images back in minutes
🍏 How to Recover Deleted Photos on iPhone (With or Without iCloud Backup)
If you’re an iPhone user, accidentally deleting your favorite photos can feel like a nightmare. 😰
But the good news is—you still have multiple ways to recover deleted photos on iPhone, even if you haven’t backed them up to iCloud or iTunes.
In this section, we’ll walk you through exactly what to do, step by step.
Whether you’ve just deleted the photo or lost it weeks ago, this guide will show you how to retrieve it safely, securely, and without technical stress.
Let’s get your memories back. 📸

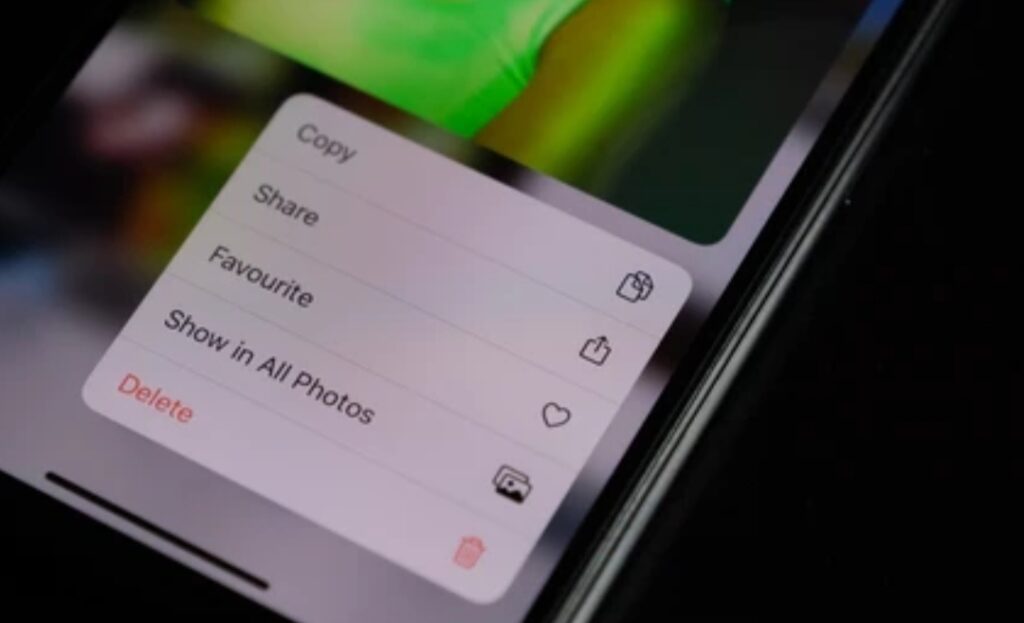
🗑️ Step 1 – Check the “Recently Deleted” Album in Photos App
The first thing you should do is head to your Photos app, where Apple provides a built-in safety net.
Your deleted images are automatically moved to the “Recently Deleted” album and stored for 30 days before being permanently removed.
👉 Here’s how to restore them:
- Open the Photos app
- Tap Albums
- Scroll down to find Recently Deleted
- Tap Select, choose your photos, then tap Recover
✅ This simple method works in most cases—even without any iCloud or iTunes backup.
🧠 Important Tip: If it’s been over 30 days, the photos may have been permanently deleted—so act fast.
☁️ Step 2 – Recover from iCloud Backup (If Enabled)
If you had iCloud Backup enabled before the photos were deleted, you can restore them by resetting your iPhone and choosing a previous backup during setup.
⚠️ This method will erase your current data—make sure to back up anything new first.
🔄 Steps to Restore via iCloud:
- Go to Settings → General → Transfer or Reset iPhone
- Tap Erase All Content and Settings
- Restart your phone and follow the setup prompts
- When asked, choose Restore from iCloud Backup
- Select the backup date before your photos were deleted
✅ If your photos were included in that backup, they’ll be restored to your gallery.
Pro Tip: Use this method only if you’re 100% sure the photos were backed up before deletion.
💻 Step 3 – Restore Deleted iPhone Photos from iTunes/Finder (Mac/PC)
If you’ve ever synced your iPhone with iTunes or Finder on your computer, there may be a local backup you can restore from.
💾 How to Recover via iTunes (Windows or macOS Mojave and earlier):
- Connect your iPhone to your computer
- Open iTunes
- Click on your device icon
- Choose Restore Backup
- Select a backup date before the deletion
💾 How to Use Finder (macOS Catalina and newer):
- Connect iPhone via USB
- Open Finder
- Select your device under Locations
- Click Restore Backup
- Choose the correct backup and restore
✅ This method works best if you’ve disabled iCloud Photo sync and used manual backups.
🧰 Step 4 – Use iPhone Photo Recovery Tools (No Backup Needed)
Even if you have no backups at all—don’t worry.
You can still recover deleted photos from your iPhone using specialized third-party tools that scan your phone’s internal memory.
Here are the top-rated recovery tools for iOS devices:
🔧 1. PhoneRescue for iOS
- Deep-scans your iPhone or iCloud for deleted files
- Works without needing a backup
- Simple interface with photo preview
👉 Try PhoneRescue now to scan your iPhone instantly
🔧 2. Dr.Fone – iPhone Data Recovery
- Recovers from iOS device, iTunes backup, or iCloud
- Works even if iPhone isn’t backed up
- Available for both Windows and macOS
🔧 3. iMyFone D-Back
- Recovers photos, messages, WhatsApp, and more
- Supports newest iOS versions
- Offers selective recovery without full restore
✅ These tools are perfect when:
- Photos were deleted over 30 days ago
- No backups are available
- You don’t want to lose new data while restoring
Most tools offer free trials, so you can preview recoverable images before committing.
📈 Bonus – Restore Deleted Photos via Third-Party Apps (Like Google Photos)
If you were using Google Photos or OneDrive on your iPhone, your photos might still be safely stored there—even if they’re gone from the native gallery.
🔍 To check:
- Open Google Photos app
- Tap Library → Trash
- If the photo is there, tap Restore
✅ This is one of the easiest ways to recover deleted photos on iPhone, especially when cloud sync is enabled.
🔐 Tips to Maximize iPhone Recovery Success
- 🔌 Keep your phone charged during scans
- 🚫 Avoid installing new apps after deletion (prevents data overwrite)
- 💾 Always back up before performing full restores
- 🧠 Use non-invasive tools first, then try deeper scans if needed
📌 Recap – iPhone Photo Recovery Roadmap ✅
- ✅ Start with the Recently Deleted album
- ✅ Use iCloud or iTunes backup if available
- ✅ Try tools like PhoneRescue or Dr.Fone
- ✅ Don’t wait too long—act fast for better results
🔥 Still think your deleted photos are gone for good? Think again!
You now have every method at your fingertips to restore those memories—even without a backup.
👉 Recover your deleted iPhone photos now with this top-rated tool
👉 Click here for instant scan and preview
🛠️ Top-Rated Apps to Recover Deleted Photos Without Backup (Android & iPhone Tools That Actually Work)
No backup? No problem. 😎
Just because your photos aren’t in Google Photos, iCloud, or the trash folder doesn’t mean they’re lost forever.
Thanks to modern data recovery technology, there are now powerful photo recovery apps that can scan your device’s storage and bring your deleted photos back—even without a backup.
This section lists the best-rated apps for both Android and iPhone in 2025, based on real user results, ease of use, scan accuracy, and safety.
Let’s explore the top tools that can help you recover deleted photos from your phone—without a single backup file. 🧠

📲 1. DiskDigger Photo Recovery (Android)
✅ Best for: Quick and deep recovery on Android devices
🔒 Root Required: No (basic scan), Yes (deep scan)
💸 Free/Paid: Free with Pro upgrade
DiskDigger is one of the most downloaded photo recovery apps on Android, known for its simple interface and deep-scanning capabilities.
It scans both internal memory and SD cards to retrieve deleted JPGs and PNGs—even if you never backed them up.
Key Features:
- Scan memory without needing root access (basic mode)
- Deep scan with root for better file recovery
- Preview before restoring
- Save recovered files to cloud or local storage
👉 Download DiskDigger now to start photo recovery instantly
🛑 2. Dumpster – Recycle Bin (Android)
✅ Best for: Preventing future accidental deletions
🔒 Root Required: No
💸 Free/Paid: Free with optional premium
Dumpster acts like a safety net for your Android device by creating a recycle bin for deleted files.
While it doesn’t recover old photos deleted before installing the app, it’s a must-have going forward.
Key Features:
- Automatically saves deleted files for recovery
- Recover photos, videos, docs, and more
- No internet required
- Easy one-tap restore
🔄 Think of Dumpster as the “undo” button your phone never had.
👉 Install Dumpster now to protect your files from future loss
🍏 3. PhoneRescue for iOS (iPhone)
✅ Best for: iPhone photo recovery without iCloud or iTunes
🔒 Root Required: No
💸 Free Trial / Paid License
PhoneRescue is a top-tier recovery app for iOS that can dig into your iPhone’s system and pull out deleted photos, even if you’ve never backed up to iCloud or iTunes.
Key Features:
- Works without backup
- Recover deleted images, messages, contacts, and more
- Compatible with all iOS versions including latest iOS 17
- Preview photos before recovery
💻 Works on both Windows and Mac via USB connection.
👉 Try PhoneRescue for iPhone photo recovery without backup
🧠 4. iMyFone D-Back (iPhone & Android)
✅ Best for: Advanced data recovery with selective restore
🔒 Root Required: No
💸 Free scan + Paid version
iMyFone D-Back supports both Android and iOS, making it a flexible recovery tool.
It’s perfect if you want to preview files before restoring and selectively choose what to recover—saving time and storage.
Key Features:
- Supports recovery without backup
- Scans WhatsApp, photos, videos, messages
- Works with broken or locked devices
- iCloud/iTunes integration included (optional)
👉 Use iMyFone D-Back for deep deleted photo recovery
🖥️ 5. Dr.Fone – Data Recovery (Android & iOS)
✅ Best for: Professional-level recovery with full control
🔒 Root Required: No (limited) | Yes (for full scan on Android)
💸 Free trial + Paid upgrade
Dr.Fone by Wondershare is an all-in-one tool that works across both platforms and offers one of the highest recovery success rates.
Key Features:
- Recovers lost data directly from device, iTunes, or iCloud
- Offers full scan for internal storage
- Supports more than 20 file types including photos, videos, and chats
- Clean UI with real-time recovery preview
👉 Get Dr.Fone now and bring your deleted photos back
🏆 Comparison Table – Best Photo Recovery Apps (No Backup Needed)
| App Name | Platform | Backup Needed | Root Needed | Free/Paid | Best Feature |
| DiskDigger | Android | ❌ No | ⚠️ Optional | ✅ Free | Deep scan for JPG/PNG from internal storage |
| Dumpster | Android | ❌ No | ❌ No | ✅ Free | Auto trash bin for future file protection |
| PhoneRescue | iOS | ❌ No | ❌ No | 💵 Paid | Direct recovery from device w/o iCloud |
| iMyFone D-Back | Both | ❌ No | ❌ No | 💵 Paid | Selective recovery with preview |
| Dr.Fone | Both | ❌ No | ⚠️ Optional | 💵 Paid | Highest success rate with pro-level scans |
💥 Stop panicking and start scanning!
The faster you act, the better your chances of full recovery.
👉 Click here to try the #1 photo recovery app now
👉 Instantly scan your phone and recover deleted photos—even without a backup
💡 Expert Tips to Boost Photo Recovery Success (Don’t Miss These Critical Steps!)
Here’s a harsh truth: the clock starts ticking the moment you delete a photo.
Your chance of recovering it drops significantly the more you use your phone afterward.
But don’t worry—by following these expert photo recovery tips, you can drastically increase your success rate and avoid common pitfalls that permanently wipe your data.
Whether you’re trying to recover deleted photos from your phone, restore lost images on Android, or recover deleted photos on iPhone, these tips will give you the upper hand.

⛔ 1. Stop Using Your Phone Immediately
As soon as you realize you’ve deleted something important, stop using your phone.
Why? Because every new app you install, photo you take, or update you run could overwrite the storage space where your deleted photos are hiding.
🧠 Here’s what to avoid:
- Don’t take more photos
- Avoid installing new apps or updates
- Don’t save new files or download anything
📌 Overwriting deleted files is the #1 reason recovery fails.
📵 2. Turn Off Wi-Fi and Mobile Data
If your phone is syncing with cloud apps or downloading automatic updates, it may overwrite the deleted data in the background.
To avoid this risk:
✅ Do this immediately:
- Put your phone in Airplane Mode
- Disable Wi-Fi and mobile data
- Close all running apps
This prevents unnecessary data changes and preserves your storage blocks.
🔍 3. Run a Deep Scan – Not Just a Quick One
Most recovery apps offer two options:
- Quick Scan – faster but less thorough
- Deep Scan – slower but finds more deleted files
Always go for the Deep Scan if your photo isn’t found in the first pass.
Deep Scans:
- Search the raw sectors of your phone’s memory
- Uncover old, buried data
- Are more effective for photos deleted weeks or months ago
🏆 Power Tip: Apps like DiskDigger Pro, Dr.Fone, and iMyFone D-Back offer advanced scanning modes with higher success rates.
🗂️ 4. Save Recovered Files to a Different Location
Once you recover your deleted photos, don’t save them to the same device or folder they were lost from.
Doing so could:
- Cause overwriting during recovery, corrupting other lost files
- Complicate future scans
- Lead to partial or incomplete restoration
✅ Instead:
- Save to a cloud drive (like Google Drive or Dropbox)
- Or use an external SD card or USB storage
- If using PC-based software, export files directly to your computer
🔒 5. Use Recovery Tools That Offer Preview Before Restore
To avoid wasting time or risking malware, choose recovery apps that let you preview files before restoring.
This allows you to:
- Confirm image quality
- Skip duplicates or corrupted files
- Only restore what matters
✅ Tools with preview feature:
- PhoneRescue for iOS
- iMyFone D-Back
- Tenorshare UltData
- Dr.Fone – Data Recovery
👀 Seeing is believing—always preview before you restore!
💾 6. Backup New Data Before Attempting Full Resets or Restores
If you’re planning to restore from iCloud, iTunes, or Factory Reset, make sure you backup your current data first.
Why? Because these methods will:
- Erase everything currently on your phone
- Only restore data from the chosen backup
- Not include new files created after that backup
To prevent losing new messages, photos, or app data, always back up before you reset.
⚠️ 7. Don’t Fall for Fake Recovery Apps
There are hundreds of sketchy apps that claim to recover deleted photos but instead:
- Spam you with ads
- Require excessive permissions
- Steal your data or install malware
Stick to trusted, well-reviewed tools only.
Recommended apps (already reviewed earlier):
- ✅ DiskDigger
- ✅ Dumpster
- ✅ Dr.Fone
- ✅ iMyFone D-Back
- ✅ PhoneRescue
🚨 If it sounds too good to be true, it probably is.
📋 Bonus: Use File Manager Apps to Manually Search Hidden Folders
Advanced users can use apps like:
- X-Plore File Manager
- Total Commander
- Solid Explorer
To search folders such as:
- .thumbnails
- .nomedia
- /DCIM/.trash
- /Android/data/
These folders sometimes hold cached or undeleted copies of image files that don’t appear in your main gallery.
🧠 Summary – Your Photo Recovery Success Checklist ✅
| Task | Action Status |
| Stop using the phone | ✅ Immediately after deletion |
| Disable Wi-Fi and Mobile Data | ✅ Reduce overwrite risk |
| Use deep scan instead of quick scan | ✅ For thorough recovery |
| Save recovered files elsewhere | ✅ Cloud, SD card, or PC |
| Preview files before restore | ✅ Verify quality |
| Backup new data before restore | ✅ Prevent new data loss |
| Use only trusted recovery apps | ✅ Avoid scams or malware |
⚡ Your photos aren’t gone yet—you’re just one smart step away from getting them back.
Follow these tips to boost your recovery success and reclaim those irreplaceable memories.
👉 Click here to use the most trusted photo recovery app now
👉 Recover deleted images before it’s too late – scan now!
🔐 Prevent Future Loss – Best Backup Practices to Keep Your Photos Safe Forever
You’ve recovered your deleted photos—awesome! 🎉
But let’s make sure it never happens again.
Losing your photos once is frustrating.
Losing them twice? Devastating. 😢
The good news is: with a few smart habits and automated backup solutions, you can permanently safeguard your images and prevent future photo loss—whether you use an Android or an iPhone.
Here are the best backup practices every smartphone user should follow to protect their memories, documents, and screenshots with ease. 🔐
☁️ 1. Enable Cloud Backup on Your Device (Google Photos or iCloud)
This is the #1 most effective way to avoid losing your photos ever again.
📱 For Android Users – Use Google Photos:
- Open the Google Photos app
- Tap your profile icon → Photos settings
- Select Backup & sync
- Turn it ON
- Choose the Google account you want to use
Google Photos offers 15GB of free storage and syncs across devices.
💡 Want unlimited backup? Use Google One or enable “Storage Saver” quality mode.
🍏 For iPhone Users – Use iCloud Photos:
- Go to Settings
- Tap your name → iCloud → Photos
- Turn ON iCloud Photos
- Make sure you have enough iCloud storage (you get 5GB free)
✅ This ensures all your photos are automatically saved to the cloud—even if your phone is lost, stolen, or broken.
💻 2. Create Regular Local Backups (PC or Mac)
Cloud backup is great, but nothing beats having a physical backup too.
For double protection, you should regularly back up your phone to a computer.
How to back up Android to PC:
- Connect your phone via USB
- Choose File Transfer or MTP mode
- Copy your DCIM, Pictures, and Download folders to your PC or external drive
How to back up iPhone to Mac/PC:
- Use iTunes (Windows/macOS Mojave) or Finder (macOS Catalina and later)
- Connect iPhone → Select device → Click Back Up Now
💾 Pro Tip: Store backups on an external hard drive for extra peace of mind.
🔄 3. Use Third-Party Photo Backup Apps
Aside from Google Photos and iCloud, there are other reliable apps that automatically back up your photos:
Recommended Apps:
- Amazon Photos – Free unlimited photo storage for Prime members
- Dropbox – Camera uploads with file history
- Microsoft OneDrive – 5GB free storage, Office integration
- Degoo – 100GB free photo storage (ad-supported)
🧠 Most of these apps offer automatic uploads, so once set up, you never have to think about it again.
🛑 4. Avoid Storing All Photos Only on Internal Storage
Internal phone storage is more vulnerable to:
- Sudden phone crashes
- Factory resets
- Accidental deletion
- Physical damage (water/fire/theft)
Instead:
- Use an SD card on Android to store your camera images
- Or auto-sync to a cloud folder
This way, if anything happens to your device, your photos remain safe.
🔄 5. Set a Weekly or Monthly Backup Reminder
Let’s face it—most people forget to back up their stuff until it’s too late.
Set a recurring reminder on your phone to:
- Back up your photos to a PC or external drive
- Check that your cloud sync is working correctly
✅ Just 10 minutes a week can save you a lifetime of regret.
🔒 6. Use Vault or Private Cloud Services for Sensitive Photos
Got sensitive or private images?
Keep them extra secure by storing them in:
- Encrypted Vault apps like Keepsafe, 1Gallery, or Safe Gallery
- Password-protected private folders in Google Drive or iCloud Drive
This adds another layer of protection—even if your phone is compromised.
🔐 Privacy tip: Choose apps that offer biometric locks (fingerprint/Face ID) and end-to-end encryption.
🧠 Summary – Best Practices Checklist to Prevent Photo Loss ✅
| Strategy | Protection Level | Frequency |
| Enable Google Photos or iCloud | ⭐⭐⭐⭐⭐ | One-time setup |
| Back up to PC/Mac | ⭐⭐⭐⭐ | Weekly/Monthly |
| Use third-party cloud apps | ⭐⭐⭐ | One-time setup |
| Store files on SD card (Android) | ⭐⭐⭐ | Ongoing |
| Set reminder to review backups | ⭐⭐⭐⭐ | Weekly/Monthly |
| Encrypt sensitive photos | ⭐⭐⭐⭐ | Ongoing |
💾 Don’t wait until it’s too late—set up your photo backup system now and protect your memories forever.
One small habit today can save years of moments tomorrow. 🕒
👉 Click here to get free cloud backup for your photos
👉 Protect your images with this automatic photo vault now
✅ FAQs – Your Top Questions Answered ❓📸
Still have questions about how to recover deleted photos from your phone?
You’re not alone.
Below are the most frequently asked questions (and their answers) about photo recovery on Android and iPhone, even without backups
Let’s clear up every concern. 💡

❓ Can I recover permanently deleted photos from my phone?
✅ Answer:
Yes, you can recover permanently deleted photos using specialized recovery tools like DiskDigger, Dr.Fone, or iMyFone D-Back, especially if the data hasn’t been overwritten.
On Android, if photos are gone from the Trash, these apps can scan your internal memory to retrieve lost files.
On iPhone, you’ll need desktop-based tools that connect via USB to perform a deep recovery scan.
❓ How do I recover deleted photos on Android without root?
✅ Answer:
You can use apps like DiskDigger (Basic Scan) or Dumpster to recover deleted photos on Android without rooting your phone
While root access gives you deeper recovery options, many modern apps still retrieve recently deleted files without root access—especially if you act quickly.
❓ How long do deleted photos stay in the Trash or Bin?
✅ Answer:
Most phones store deleted photos in the Trash, Bin, or Recently Deleted folder for:
- 📱 Samsung: 30 days
- 📸 Google Photos: 60 days
- 📂 iPhone Photos App: 30 days
After that time, the files are automatically and permanently erased.
❓ Can I recover photos if I didn’t back them up?
✅ Answer:
Yes. Even without a backup, it’s still possible to recover your deleted images using:
- Photo recovery apps (DiskDigger, Dumpster)
- Desktop tools (Dr.Fone, PhoneRescue, iMyFone D-Back)
These apps scan unallocated space in your device’s memory to retrieve files that haven’t yet been overwritten.
🧠 Act fast: the longer you wait, the lower the chances of recovery.
❓ Are deleted photos recoverable after a factory reset?
✅ Answer:
Yes, but it’s much harder.
A factory reset erases most recoverable data. However, advanced tools like Tenorshare UltData, Dr.Fone, or iMyFone D-Back may still find traces—especially on rooted Android devices or iPhones with prior backups.
⚠️ Best chance is to recover photos before resetting your phone.
❓ Is it safe to use photo recovery apps?
✅ Answer:
Yes—if you choose reputable, well-reviewed apps like:
- DiskDigger
- Dr.Fone
- iMyFone D-Back
- PhoneRescue
Avoid sketchy apps with poor reviews, unknown publishers, or excessive permissions.
Always download from trusted sources like Google Play, Apple App Store, or official websites.
❓ What’s the best app to recover deleted photos from my phone?
✅ Answer:
Here are the top-rated apps, depending on your device:
📱 Android:
- DiskDigger (no root or with root)
- Dumpster (future-proofing)
- Dr.Fone for Android
🍏 iPhone:
- PhoneRescue for iOS
- iMyFone D-Back
- Dr.Fone for iOS
👉 Each app has its pros, so choose one based on how recently the photo was deleted and whether backups exist.
❓ What should I do first after accidentally deleting photos?
✅ Answer:
Immediately do the following:
- Stop using your phone
- Disable Wi-Fi and mobile data
- Check the Trash/Recently Deleted folder
- Use a recovery app as soon as possible
- Avoid saving anything new to the same storage
⏱️ Time is critical—acting fast increases recovery success dramatically.
❓ Can I recover photos from an old backup?
✅ Answer:
Yes. You can restore old photos from:
- iCloud/iTunes backup on iPhone
- Google Photos/Google Drive on Android
- PC/Mac backups if you’ve synced your phone before
If using recovery software, some tools let you extract photos from backups selectively, so you don’t overwrite new data.
❓ How can I make sure I never lose photos again?
✅ Answer:
Use these 3 backup layers:
- Enable Google Photos or iCloud Photo Library
- Back up to a PC/Mac or external drive monthly
- Use a secondary cloud service like Dropbox, OneDrive, or Amazon Photos
🔐 Combine all three, and your photos will be safe forever—even if your phone isn’t.
💡 Don’t leave your memories to chance.
Recover them today—and protect them for the future.
👉 Click here to try the best-rated recovery tool now
👉 Set up your cloud backup in 60 seconds or less – never lose a photo again!
🔚 Final Thoughts – Recover, Backup & Protect Your Memories Forever 💾💡
Photos aren’t just digital files — they’re your memories.
From first steps to last goodbyes, from travels to celebrations, they tell your story.
Accidentally deleting a photo can feel like losing a moment you’ll never get back.
But now, you know the truth: deleted doesn’t mean gone forever.

Whether you need to:
- 🔄 Recover deleted photos on Android or iPhone
- 💻 Restore lost files without any backup
- ☁️ Prevent future loss through smart, automated backups
– you’ve got the complete, expert guide to handle it all.
You’ve learned:
- How to check built-in trash folders
- What tools work best (even with no backups)
- How to increase your recovery success rate
- The smartest ways to protect your memories for life
And here’s the most important takeaway:
🧠 The sooner you act, the better your chance of full recovery.
💾 The sooner you back up, the less you’ll ever need to recover.
⏳ Don’t wait until it’s too late. Start your recovery now—and secure your photos for good.
👉 Click here to scan your phone for deleted photos instantly
👉 Set up auto cloud backup in just 1 minute – protect your memories forever
You might also like :