
Introduction – Why Learning How to Scan Documents with Your Phone Is a Game-Changer 📲
In today’s fast-paced digital world, knowing how to scan documents with your phone isn’t just convenient — it’s an essential productivity skill that can save you time, money, and stress.
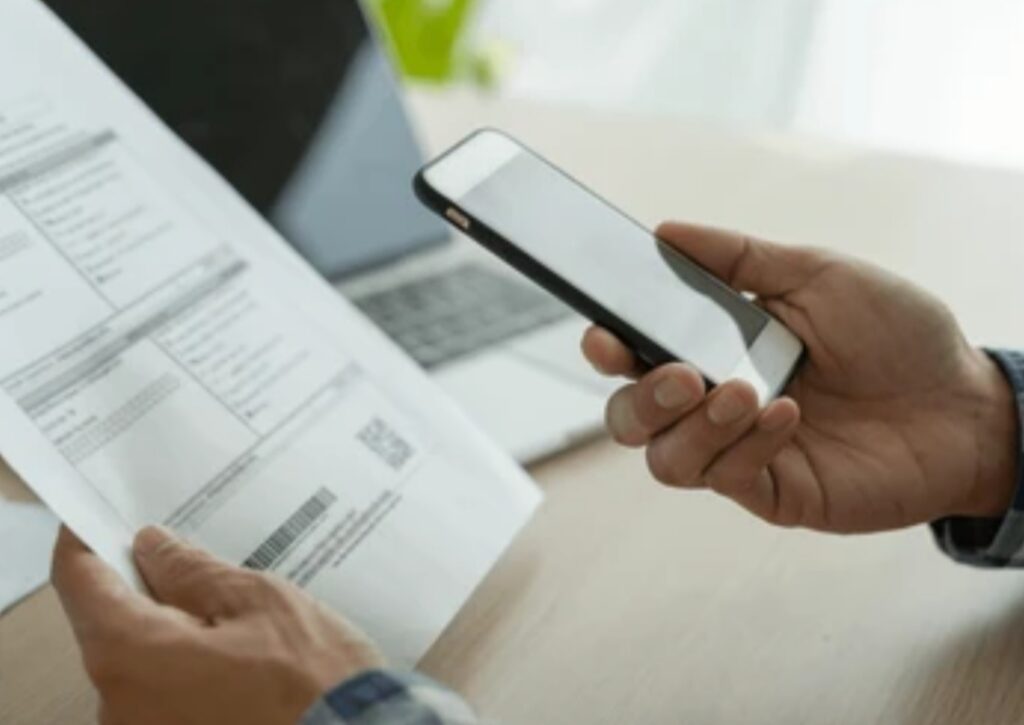
Whether you’re a student submitting assignments, a remote worker handling paperwork, or a business owner sending invoices, being able to scan docs with phone anytime, anywhere gives you instant access to a mobile office in your pocket.
That’s the beauty of today’s technology: 📱 you no longer need a bulky, expensive scanner to digitize important paperwork.
Thanks to the rise of powerful mobile scanning apps, all you need is your smartphone, a steady hand, and a few expert tricks to scan crisp, professional-looking documents in seconds.
✅ In fact, many of the best scan apps now offer features like:
- Auto-cropping
- OCR (Optical Character Recognition)
- Cloud syncing
- Batch scanning
- One-tap export to PDF or JPG formats
And the best part? Most of them are FREE or budget-friendly!

🔍 Why Is Mobile Scanning So Popular in 2025?
We live in an age of remote jobs, paperless offices, and instant communication.
The traditional way of scanning — using a printer/scanner combo or flatbed scanner — is too slow, bulky, and inflexible for modern users.
Here’s why learning how to scan documents with your phone is the new norm:
- 📥 Instant Digital Backup: Scan and store contracts, receipts, and notes directly to the cloud.
- 📤 Easy Sharing: Email, upload, or message scanned files with just one tap.
- 🧾 Paperless Organization: Say goodbye to cluttered desks and lost papers.
- 💡 Smarter Workflow: Quickly digitize documents during meetings, travel, or on-site client work.
This post is your complete 2025 guide to scanning like a true pro — even if you’ve never done it before.
We’ll show you:
- The best scan apps for iPhone and Android
- A full step-by-step guide for flawless scanning
- Real-world pro tips for maximum clarity and accuracy
- Common mistakes to avoid
- And powerful ways to organize, enhance, and share your scanned files like a boss
📈 Optimized for Google & You: Practical, Powerful, Proven
If you’ve been searching for a 2-minute trick to scan documents with your phone, or wondering “What’s the best scan app to use for work or school?” — you’re in the right place.
By the end of this blog, you’ll confidently know how to:
- 📑 Scan multiple pages into one clean PDF
- 🔍 Use OCR to extract text for editing
- ☁️ Sync your scans to Google Drive, iCloud, or Dropbox
- 🔐 Keep your digital documents safe, secure, and searchable
This guide is fully updated for 2025 standards, using the latest scanning app features and cloud integrations.
No outdated methods. No generic tips. Just real, actionable insights that help you get professional results fast — right from your smartphone.
💡 Who Is This Guide For?
This comprehensive article is for:
- 🧑🎓 Students who want to scan homework, lecture notes, or worksheets
- 🧑💼 Freelancers and remote workers managing contracts or time sheets
- 👩🏫 Teachers and educators digitizing class materials
- 📲 Everyday users who want a fast way to back up receipts, bills, or forms
- 🧳 Travelers scanning IDs, itineraries, or business cards on the go
So whether you’re a digital nomad, stay-at-home parent, or corporate executive, you’ll find powerful scanning tips in this article to help you level up your mobile productivity.
🔔 Bold Promise: You’ll Never Need a Physical Scanner Again!
Ready to ditch your old scanner and unlock the full power of your smartphone?
✨ Then keep reading, because we’re about to show you how to scan documents with phone like a real expert, using the best scan apps, and share must-know hacks that professionals use daily.
👉 Let’s dive in and transform your phone into a high-quality portable scanner!
💥 Pro Tip: Bookmark this guide now, so you always have these expert scanning techniques at your fingertips.
➡️ Download one of these top-rated scan apps now to get started instantly.
What You Need Before You Start Scanning Documents with Your Phone 📋
Before you start scanning like a pro, you need to make sure you have the right tools and setup to get clean, high-resolution scans from your mobile device.
✅ Don’t worry — it doesn’t require expensive gear or a complex setup.
All you need are a few simple essentials to scan docs with phone effectively and professionally — whether it’s a multi-page contract, a handwritten form, or a stack of receipts.
In this section, we’ll walk you through everything you need before scanning, from phone specs to lighting and setup.
These steps ensure that every scan looks clean, sharp, and ready to send, save, or upload.
📱 1. A Smartphone with a Decent Camera
This might sound obvious, but it’s worth stating — your phone’s camera quality directly affects the clarity of your scanned documents.
- For best results, use a smartphone with at least a 12MP camera (iPhone 8 or newer, most modern Android phones will do).
- Make sure your camera lens is clean and smudge-free.
- Enable auto-focus and grid lines in camera settings to help with alignment.
✅ Pro Tip: Avoid digital zoom when scanning. Instead, hold the phone closer for clearer, high-res results.
If you’re using older phones or budget models, don’t worry — the best scan apps usually have built-in enhancements like edge detection and smart contrast to improve image quality.
💡 2. Good Lighting Is Everything
Lighting plays a huge role in scanning clarity.
Even the best apps can’t fully fix a scan that’s dark or covered in shadows.
Here’s how to get optimal lighting for scanning:
- Use natural daylight near a window if possible.
- Avoid overhead lights that cause glare or shadows.
- Never scan under dim or yellow-toned lights — it ruins white balance.
✅ Bonus Tip: If you’re scanning under artificial light, position a lamp diagonally, not directly above the paper, to avoid harsh reflections.
📄 3. A Flat, Non-Reflective Surface
Your scanning surface should be:
- Flat and stable (avoid soft surfaces like beds)
- Dark-colored if you’re scanning white pages (for better edge detection)
- Clean and clutter-free
Avoid glass or shiny tables, as they can cause unwanted glare.
Place the document neatly and straighten the corners — this helps your scan app auto-detect edges correctly.
📥 4. Download One of the Best Scan Apps 📲
Choosing the right app is just as important as the camera or lighting.
The best scan apps offer smart tools like:
- Auto-cropping
- Edge detection
- Image enhancement
- OCR (text recognition)
- Multi-page scan support
- Cloud storage integration (like Google Drive, Dropbox, OneDrive)
Here are a few must-have scanning apps to consider:
| Scan App | Platforms | Highlights | Best For |
| Adobe Scan | iOS & Android | OCR, auto-enhance, cloud sync | Professionals & freelancers |
| Microsoft Lens | iOS & Android | Multi-format export, document to Word/PDF | Business & office work |
| CamScanner | iOS & Android | Batch scanning, smart cropping, cloud options | Students & remote workers |
| Genius Scan | iOS & Android | Tagging, encryption, export options | Privacy-focused users |
| Google Drive App (built-in) | Android | Simple, fast, syncs directly to Google Drive | Casual and everyday scanning |
📌 Power Tip: Choose the app that fits your workflow. If you’re a Google Workspace user, Google Drive works great. For freelancers, Adobe Scan offers more professional options.
🔒 5. Optional: A Secure Cloud Storage or Folder System
Once you start scanning documents with your phone regularly, you’ll quickly build up a digital archive.
That’s why it’s smart to set up:
- A folder system by category (e.g. “Receipts”, “Contracts”, “Invoices”)
- Cloud backups with auto-sync (Dropbox, iCloud, OneDrive, Google Drive)
- Encrypted folders or file-locking apps for sensitive info
This makes it super easy to retrieve, share, or print documents anytime — without digging through your phone gallery.
✅ Expert Tip: Enable cloud sync from your scan app settings for automatic backup and anywhere access.
⚙️ Bonus Tools That Take Your Mobile Scanning to the Next Level
To scan docs with phone like a seasoned pro, consider these extras:
- 📏 Document guide frames: To help align the paper
- 📸 Mini tripod or phone stand: For steady scans
- ✋ Stylus or markup app: For signing or annotating scanned PDFs
- 🛡️ Security app: To encrypt or password-protect sensitive scans
These aren’t mandatory — but they’ll definitely make your scanning workflow smoother, faster, and more secure.
🚀 Now You’re Ready to Scan Like a Pro
Once you’ve got your phone, lighting, surface, and scan app ready, you’re all set to turn any physical paper into a crystal-clear digital copy in seconds.
No need for a scanner. No waiting. No stress.
You’ve got everything you need — right in your pocket.
💥 Ready to go paperless the smart way? Then it’s time to download your favorite scan app and start digitizing like a boss!
👉 Tap here to try one of the top-rated scan apps now and unlock mobile scanning superpowers today!
The Best Scan Apps for Your Phone (iOS & Android) 📲 – Comparison, Features & Pro Tips
When it comes to how to scan documents with phone, one of the biggest game-changers is using the right app.
Gone are the days of low-quality camera pics or unreliable apps that crop your documents poorly.
Today’s top-tier mobile scanning apps turn your smartphone into a professional-grade scanner — complete with auto-enhancement, OCR text recognition, and cloud sync capabilities.
In this section, you’ll discover the best scan apps for iOS and Android devices, along with their key features, best use cases, and even pro tips to help you get the most out of them.
We’ve tested and reviewed the top contenders to help you make the smartest choice based on your needs.

✅ Top 5 Best Scan Apps You Can Trust in 2025
Below is a comparison table of the most popular, high-performance document scanning apps:
| 📱 App Name | 🔧 Key Features | 💼 Best For | 💰 Cost | 📲 Download Link |
| Adobe Scan | Auto OCR, auto crop, enhance, sync to Adobe Cloud | Professionals, freelancers | Free (with optional Adobe Cloud) | Get Adobe Scan |
| Microsoft Lens | Scan to Word/PDF, OCR, OneDrive sync | Office & business users | Free | Get Microsoft Lens |
| CamScanner | Batch scanning, smart filters, cloud storage, watermark control | Students & remote workers | Freemium | Get CamScanner |
| Genius Scan | Export to PDF/JPG, document tags, encryption | Privacy-focused scanning | Free with Pro version | Get Genius Scan |
| Google Drive Scanner | Built-in camera scanning with auto-save to Drive | Casual users & Android users | Free | Get Google Drive App |
🔍 1. Adobe Scan – Best for Professionals & Freelancers
If you’re serious about scanning, Adobe Scan is one of the most powerful mobile scanning tools available.
Top Features:
- Text recognition (OCR) for editable PDFs
- Automatic edge detection
- Auto-enhancement and shadow removal
- Cloud sync with Adobe Document Cloud
- Easy export to JPG, PDF, or text
Why It’s Great:
Adobe Scan shines in business use-cases like contracts, invoices, receipts, and even whiteboards or handwritten notes.
It’s also ideal if you’re already using Adobe products like Acrobat or Creative Cloud.
📌 Pro Tip: Turn on OCR to make your scans searchable — perfect for large archives.
👉 Download Adobe Scan Here
🔍 2. Microsoft Lens – Best for Office Use & Cloud Integration
A great tool from Microsoft, Lens is particularly handy if you work in the Microsoft 365 ecosystem.
Top Features:
- Scan to Word, PowerPoint, or OneNote
- Sync to OneDrive or local storage
- Whiteboard and business card mode
- Supports OCR and handwriting detection
Why It’s Great:
Microsoft Lens excels at office documents, handwritten notes, and printed materials. If you work in corporate or education, it’s a no-brainer.
📌 Pro Tip: Use the “Whiteboard Mode” for scanning meeting notes or classroom boards.
👉 Get Microsoft Lens Here
🔍 3. CamScanner – Best for Power Users & Batch Scanning
CamScanner has been around for years and offers a robust all-in-one mobile scanning suite.
Top Features:
- Multi-page batch scanning
- Advanced crop and filter controls
- OCR with translation options
- Cloud backup options
- File password protection
Why It’s Great:
This app is ideal for people who scan high volumes of documents, like teachers, admin staff, or small business owners.
📌 Pro Tip: Upgrade to CamScanner Premium to remove watermarks and access additional storage.
👉 Download CamScanner Here
🔍 4. Genius Scan – Best for Privacy & Simplicity
Genius Scan focuses on privacy, encryption, and offline scanning, making it a great choice for sensitive documents.
Top Features:
- Smart cropping and image enhancement
- Scan to PDF or JPG
- File tagging and organization
- End-to-end encryption (Pro version)
- Works fully offline
Why It’s Great:
This app is excellent for lawyers, doctors, or users handling confidential information.
📌 Pro Tip: Use tags and folders to easily organize your scans into categories.
👉 Get Genius Scan Here
🔍 5. Google Drive Scanner (Android Only) – Best for Everyday Use
Most Android users don’t realize this — but Google Drive has a powerful, free scanner built right into the app.
Top Features:
- Built-in camera scan function
- Auto crop and enhance
- Auto-save to Google Drive
- Shareable link generation
- Completely free
Why It’s Great:
Perfect for casual users who need quick scans and automatic cloud backup.
📌 Pro Tip: Create a dedicated “Scans” folder in Drive to keep everything organized.
👉 Open Google Drive & Use Built-in Scanner
🛠️ How to Choose the Best Scan App for Your Needs
Ask yourself these quick questions:
- Do I need OCR and text editing? ➜ Go with Adobe Scan or Microsoft Lens.
- Do I want quick cloud backup? ➜ Try Google Drive or CamScanner.
- Do I handle sensitive files? ➜ Use Genius Scan for encryption.
- Do I scan daily and need fast processing? ➜ CamScanner or Adobe Scan work best.
- Do I want a completely free tool? ➜ Microsoft Lens or Google Drive are solid options.
⚡ Pro Tips for All Scan Apps
- 🔋 Always scan with your phone plugged in to avoid sudden shutdowns.
- ✨ Use the auto-enhance feature for cleaner, high-contrast scans.
- 📤 Export files as PDF for universal sharing and viewing.
- 📲 Always check for app updates to access the latest features and fixes.
🚀 Ready to Choose Your Scanning App?
Now that you know the best scan apps and what each one excels at, it’s time to take action.
Whether you need simple scans or professional results, there’s a perfect app waiting for you.
🔥 Don’t wait — Download your ideal scan app now and unlock scanning superpowers today!
Step-by-Step Guide: How to Scan Docs with Phone Like a Pro 📸
So, you’ve got your smartphone ready, installed one of the best scan apps, and found the perfect lighting.
Now it’s time to learn the actual process of how to scan documents with phone — the right way.
While scanning a paper with your phone may seem simple, there are professional techniques that can help you get clear, sharp, and usable digital documents every time.
Whether you’re digitizing a receipt, an assignment, a signed contract, or even a handwritten note, the following step-by-step guide will show you how to scan docs with phone like a real pro.

📋 Step 1: Launch Your Chosen Scan App
Open the scan app you downloaded earlier — whether it’s Adobe Scan, Microsoft Lens, CamScanner, or Genius Scan.
Most apps will have a dedicated “Scan” or “Camera” button right on the home screen.
✅ Pro Tip: Some apps like Google Drive let you scan directly without launching a separate scanner.
Make sure your phone is in portrait orientation unless you’re scanning a landscape document like a certificate.
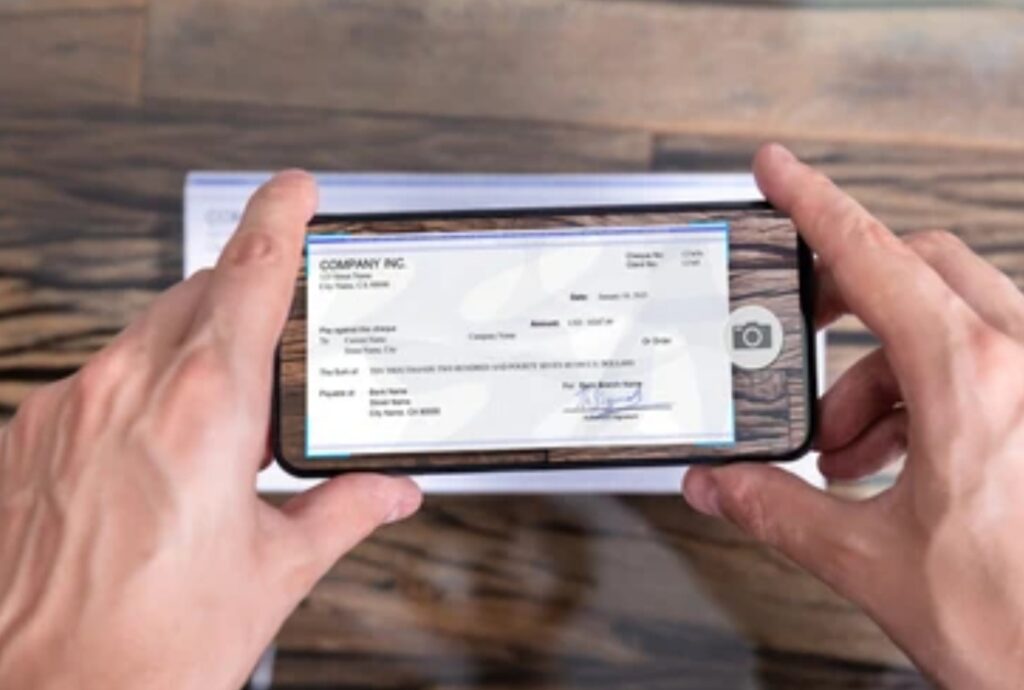
📸 Step 2: Align the Document Under Good Lighting
Place your paper document on a flat, dark-colored surface with plenty of natural light or a well-lit lamp.
Hold your phone directly above the document — not at an angle — to avoid distortion.
Most scanning apps now support auto-detection of document edges, so you don’t need to worry too much about precision — but it helps!
✅ Avoid using flash unless necessary, as it can cause unwanted glare or shadows.
🟦 Step 3: Let the App Auto-Detect Edges and Focus
Modern scan apps automatically:
- Detect page edges
- Focus your camera
- Apply lighting correction
- Crop unnecessary background
Wait a second or two to let your camera auto-focus.
You’ll typically see a glowing box or outline around the paper before the scan is taken.
Some apps allow you to manually adjust the edges, so use pinch-to-zoom or drag-corner options if needed.
✅ Power Tip: Use a dark background to enhance edge detection — especially when scanning white paper.
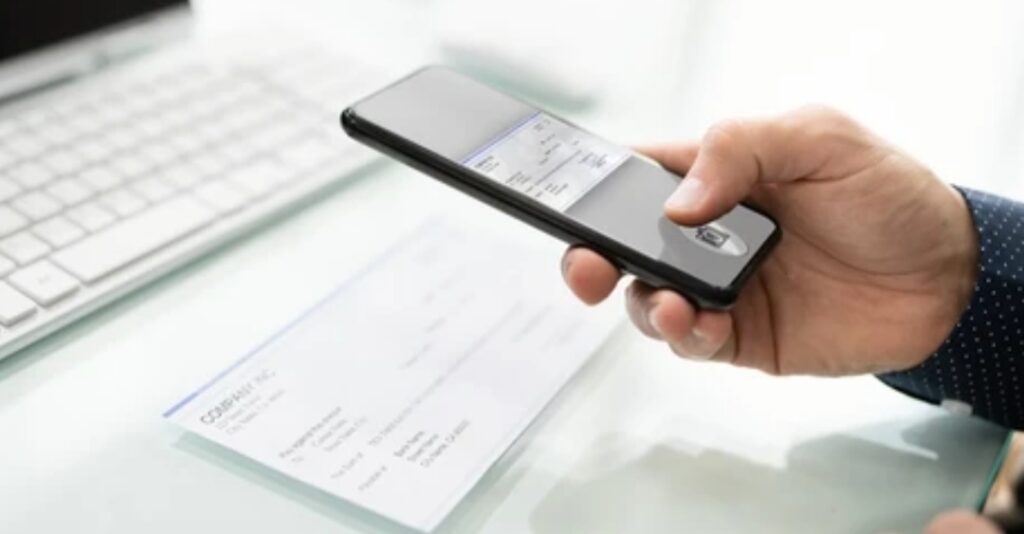
🖼️ Step 4: Review the Preview and Adjust Settings
After the scan is taken, you’ll be shown a preview where you can:
- Crop or recapture
- Rotate or straighten the image
- Apply filters like B/W, color, document mode
- Enhance contrast or brightness
- Add additional pages (multi-page mode)
This is where you can clean up blurry areas, remove shadows, or apply OCR (if your app supports it).
Most apps allow you to rescan individual pages if you’re scanning a document with multiple pages.
✅ This step helps ensure your phone-scanned documents look like they were done on a flatbed scanner.
📎 Step 5: Add a Title and Save to Your Preferred Format
Once your scan looks good:
- Rename the file with a descriptive title (e.g. “Client_Contract_March2025”)
- Choose your format: PDF, JPG, or TXT (if OCR applied)
- Tap “Save” or “Export”
We recommend PDF format for multi-page scans or professional documents.
For images like receipts or ID cards, JPG works just fine.
✅ File Naming Tip: Always include a date or category tag in your filename to help with future searches.
☁️ Step 6: Save to Cloud or Share Instantly
All the best scan apps give you flexible options:
- Upload to cloud (Google Drive, OneDrive, Dropbox, iCloud)
- Email directly from the app
- Share via WhatsApp, Telegram, or Slack
- Save locally or to SD card
You can also set auto-backup options so that every scan you do gets stored safely in the cloud.
🔥 Never lose a document again — turn your phone into a cloud-connected scanner that’s always ready.
✅ Pro Tip: If you’re scanning legal or sensitive files, encrypt your PDFs or use password protection features before uploading.
🔐 Bonus: How to Scan Multiple Pages into One File
Want to scan a 3-page form, or a full contract?
Just tap the “+” or “Add Page” button after each scan.
Your app will compile all the pages into a single PDF document, in the correct order.
Make sure to preview all pages before saving.
This is especially helpful for:
- Assignments
- Tax documents
- Legal forms
- Invoices
💬 Summary: Professional-Level Scanning in 6 Easy Steps
Here’s a quick recap of the full scanning workflow:
- Open your scan app
- Align your document properly
- Let the app auto-detect edges and focus
- Edit, crop, and enhance your scan
- Save in your preferred format (PDF or JPG)
- Upload to cloud or share instantly
Done right, this process takes less than a minute per document — and the results look just like a high-end desktop scanner.
🔥 Now It’s Your Turn: Start Scanning Like a Pro!
With just a smartphone and the right app, you’ve now unlocked the power to scan docs with phone faster, better, and smarter.
🎯 Want to get started immediately?
👉 Download one of the best scan apps now and try scanning your first document — right where you are!
You’ll be amazed at the results.
📌 Bookmark this guide so you always have it handy the next time you need to scan something on the fly.
Pro Tips to Improve Scanning Quality 🧠 – Get Clearer, Cleaner Results Every Time
Scanning a document with your phone is fast and easy — but if you want high-quality, professional-looking scans, a few expert tweaks can take your results from “decent” to “flawless.”
Even with the best scan apps, your scanning quality ultimately depends on technique.
If you’ve ever ended up with:
- Blurry or tilted scans
- Hard-to-read text
- Washed-out receipts
- Poor OCR results
…then these scanning quality tips are your secret weapon.
Here’s how to go beyond basic scanning and truly scan documents with phone like a pro 👇
🔆 1. Use Natural Light or Diffused LED Lamps
Lighting is EVERYTHING when scanning documents with your phone.
Avoid shadows, glare, or dim environments — they ruin the scan quality, no matter how advanced the app is.
Best lighting practices:
- Scan near a window with indirect daylight
- Use a desk lamp with white LED light, not yellow bulbs
- NEVER scan under a flickering or direct overhead light
- If shadows are visible, tilt the light source or rotate the document slightly
✅ Lighting tip: You can also use a white poster board or foam sheet underneath the paper to help reflect even lighting.
🧽 2. Always Clean Your Camera Lens Before Scanning
You’d be surprised how many scans are ruined by a dusty or fingerprint-covered lens.
Even the best smartphone camera can’t fix a smudged lens.
Quick trick:
Use a microfiber cloth or a clean glasses wipe before every scan session.
✅ Avoid paper towels or rough fabrics — they can scratch your lens over time.
📏 3. Keep the Document Flat & Well-Aligned
- Place your paper on a flat, non-reflective surface
- Smooth out wrinkles or folds
- Align your phone parallel to the document (not angled!)
- Use gridlines or guide overlays (available in some apps)
This helps your scan app detect edges more accurately and reduces perspective distortion.
📌 Pro gear bonus: Consider using a mini tripod or smartphone stand for perfect alignment every time.
🎛️ 4. Use Auto-Enhance and Filters (Don’t Skip This!)
Most modern scan apps include auto-enhance features — but many users skip them.
Enhancement options include:
- Black & white mode (great for contracts or forms)
- Color document mode (ideal for posters or ID cards)
- Grayscale for notes or receipts
- Brightness and contrast sliders
✨ These make your scanned docs clearer, crisper, and easier to read — especially when printed or faxed.
✅ OCR Boost Tip: Better contrast = better OCR text recognition results.
🧠 5. Turn On OCR (Optical Character Recognition)
If you want to copy, edit, or search the text in your scanned documents, make sure you enable OCR in your app.
OCR helps convert your scan into editable digital text.
It works best when:
- The document has good lighting and contrast
- The font is standard (not handwritten or stylized)
- The scan is clean and flat
📝 Bonus Tip: Some apps support multi-language OCR, so make sure to set the right language for better accuracy.
🧷 6. Use Batch Scanning for Multi-Page Documents
If you’re scanning more than one page — like contracts, class notes, or reports — always use batch or multi-page mode.
This feature lets you:
- Scan all pages in one go
- Preview and reorder pages before saving
- Combine everything into a single PDF file (no more merging later!)
✅ Best for: Assignments, legal docs, eBooks, invoices, and tax paperwork.
📤 7. Save in the Right Format: PDF or JPG?
📄 PDF is best for:
- Multi-page documents
- Forms
- Legal or business use
- OCR-based searchable files
🖼️ JPG is best for:
- Single-page scans
- Receipts or ID cards
- Uploading to websites or apps
- Lightweight storage
✅ Pro Tip: Most scan apps allow you to export in both formats. Some even support DOC or TXT (with OCR).
🛡️ 8. Protect Sensitive Scans with Passwords or Encryption
If you’re scanning confidential files (like medical documents, contracts, or ID cards), take security seriously.
Many best scan apps like CamScanner and Genius Scan offer:
- Password protection for PDFs
- Face/Touch ID lock
- Cloud encryption
- Offline storage options
✅ Pro Security Tip: Always store sensitive scans in encrypted cloud folders or offline-secure apps.
🗂️ 9. Organize Scans with Tags, Folders & Sync
Scanning is just the first step. Keeping your documents organized is the real pro move.
- Use tags or labels to group by type (e.g., “Receipts,” “School,” “Contracts”)
- Create folders in your cloud app (e.g., “2025_Tax_Receipts”)
- Enable auto-sync to Google Drive, OneDrive, or Dropbox
✅ Tip: Apps like Genius Scan let you auto-tag and auto-name your scans for faster filing.
💥 Final Word: Quality Scanning Is All in the Details
Mastering these simple scanning tips will help you:
- Create crisp, clear, readable scans
- Boost your OCR accuracy
- Present your documents professionally
- Stay organized and secure in your digital workflow
📸 Whether you’re scanning for school, work, business, or personal use — these pro tips guarantee that your mobile scans look sharp and polished every single time.
👉 Take Action: Try These Scanning Hacks Today
Don’t settle for blurry, uneven scans!
You’ve got the tools and insider secrets — now put them to work.
➡️ Download one of the best scan apps here
➡️ Test these tips with your next receipt, form, or paper
📌 Bookmark this section so you can come back anytime and level up your scanning game!
How to Organize and Share Your Scanned Documents 🗂️ – Keep It Clean, Safe, and Accessible
Once you’ve learned how to scan documents with phone like a pro, the next step is just as important — knowing how to organize, store, and share your scanned docs effectively.
Without proper organization, your scans can quickly pile up in your gallery or cloud, making it hard to find what you need when you need it.
In this section, you’ll learn how to turn your scanned files into a well-managed, easy-to-access digital archive, and the best ways to securely share documents with clients, colleagues, or yourself.
Let’s keep your documents organized, protected, and ready to go.
📁 1. Create a Simple Folder System (Digital Filing Cabinet)
Think of your cloud storage like a digital filing cabinet.
To stay organized, group your documents into logical categories.
Here’s a simple folder structure you can use:
📁 Personal
📄 Receipts
📄 ID Copies
📄 Bills & Statements
📁 Work
📄 Contracts
📄 Reports
📄 Signed Documents
📁 School
📄 Notes
📄 Assignments
📄 Certificates
📁 Medical
📄 Prescriptions
📄 Lab Results
📄 Insurance
✅ Use year-based folders like “2025 Receipts” to make tax time easier.
🏷️ 2. Use Consistent File Naming for Easy Search
A messy file name like scan1234.pdf won’t help you later.
Instead, name your scans with clear, searchable titles:
- ✅ “Client_Contract_JohnDoe_March2025.pdf”
- ✅ “Receipt_AppleStore_2025-07-05.jpg”
- ✅ “Assignment_Physics_Topic3.pdf”
📌 Use underscores (_) or dashes (-) for readability, and always include a date if relevant.
☁️ 3. Sync to the Cloud for Access Anywhere
Don’t let your scans sit on your device.
Almost all the best scan apps integrate directly with major cloud storage platforms like:
- 📁 Google Drive
- 🗄️ Dropbox
- 📦 OneDrive
- 🍎 iCloud
Set up auto-sync, so every scan you make is automatically backed up in the right folder.
✅ This protects your files from being lost if your phone gets damaged or stolen.
🔥 Pro Tip: Use apps like Adobe Scan or CamScanner that auto-sync scans into pre-selected folders.
🔐 4. Secure Sensitive Files with Password Protection
If you’re scanning private documents (like IDs, contracts, tax forms, or medical records), don’t risk storing them unsecured.
Here’s how to secure your scans:
- Use apps like Genius Scan Pro or CamScanner Premium that offer PDF password protection
- Store sensitive files in encrypted folders (Google Drive and Dropbox support this with add-ons)
- Use biometric app locks (Fingerprint/Face ID) for added protection
✅ Security Reminder: Never send sensitive scans through unsecured channels like public messengers or open emails.
📤 5. Share Your Scans Safely and Professionally
Need to send your scan to a client, team member, or government office?
Most scan apps have built-in share options:
You can share via:
- 📧 Email (attach PDF or JPG)
- 📎 Instant link (Google Drive, Dropbox)
- 🗨️ Messaging apps (WhatsApp, Telegram)
- 🌐 Upload to cloud, then share link with expiration date
📌 Sharing Tip: When sharing contracts or important files, send them as PDFs — they’re more secure and harder to alter.
✅ Double-check file size before emailing — PDFs are usually lighter than images.
🧠 6. Bonus: Use Tags & Search Tools for Faster Retrieval
If you’re scanning dozens of documents regularly, you need a smart way to find them fast.
Here’s how:
- Use document tags or labels (available in apps like Genius Scan and Notebloc)
- Enable OCR and full-text search in apps like Adobe Scan or Microsoft Lens
- Search your scans by date, file name, or content keywords
This makes it crazy easy to find that lost invoice or signed form in seconds — even months later.
✅ Pro Tip: OCR not only helps you extract text, it turns scanned PDFs into searchable documents inside your cloud app!
🧾 Summary: Keep Your Scanned Docs Organized & Ready to Go
Here’s a recap of how to stay on top of your scans like a true document ninja:
- 📂 Create folders based on type or year
- 🏷️ Name files properly for future searches
- ☁️ Auto-sync to cloud platforms
- 🔐 Protect private scans with encryption or passwords
- 📤 Share scans safely using secure links or PDFs
- 🔍 Use search and tags to find files in seconds
🚀 Take Action: Organize Like a Pro Starting Today!
You’ve already mastered how to scan docs with phone, now it’s time to take control of your digital paper trail.
🎯 Don’t wait — go into your scan app right now and start tagging, naming, and sorting your files.
💼 Want to upgrade your workflow?
👉 Grab one of the best scan apps with cloud sync + OCR now and organize smarter, not harder.
Common Mistakes to Avoid When Scanning with a Phone ⚠️ – Avoid These Costly Scanning Errors
Even if you’re using one of the best scan apps and a top-tier smartphone, small mistakes can lead to poor scan quality, unreadable documents, or even lost files.
Knowing what not to do is just as important as knowing how to scan documents with phone the right way.
In this section, we’ll break down the most common errors people make when scanning — and how to fix or avoid them completely.
Avoid these pitfalls and you’ll be scanning like a pro every single time.

❌ 1. Scanning in Poor Lighting
One of the biggest rookie mistakes?
📉 Scanning documents in dim or uneven lighting.
This causes:
- Blurry or grainy images
- Shadow overlays
- Washed-out text
- Low OCR accuracy
✅ Fix:
Always scan in natural daylight or under a diffused LED lamp.
Avoid overhead light or flash glare directly above the paper.
❌ 2. Using the Phone Camera Instead of a Scan App
It’s tempting to snap a quick photo of a document using your regular camera app.
But this method lacks:
- Auto edge detection
- Document correction
- Image enhancement
- OCR and cloud export
✅ Fix:
Use dedicated scanning apps like Adobe Scan, CamScanner, or Microsoft Lens — they’re built for this job.
❌ 3. Not Cropping or Adjusting the Scan
After scanning, many users skip the edit stage — leaving crooked, misaligned, or cluttered scans.
This makes documents hard to read and look unprofessional.
✅ Fix:
Take a moment to:
- Crop properly
- Rotate if needed
- Use filters to enhance clarity
- Preview before saving
❌ 4. Saving Everything to the Phone Gallery
By default, some users save scans to their photo gallery, which clutters the camera roll and makes important documents hard to locate.
Even worse? If your phone is lost, so are your files.
✅ Fix:
Enable cloud sync in your scan app and save directly to:
- Google Drive
- OneDrive
- Dropbox
- iCloud
✅ Create dedicated folders and auto-backups to avoid chaos.
❌ 5. Not Using OCR When Needed
OCR (Optical Character Recognition) is a game-changer — but many people ignore it or don’t know it exists.
Without OCR, you can’t:
- Copy and paste scanned text
- Search inside PDF documents
- Extract editable content
✅ Fix:
Always enable OCR in your scan app for editable and searchable scans.
Apps like Microsoft Lens and Adobe Scan have excellent OCR engines.
❌ 6. Forgetting to Name or Tag Files Properly
Saving a scan as Scan_1234.pdf might seem quick, but you’ll regret it later when you’re digging through dozens of files.
✅ Fix:
- Use clear file names: e.g., Invoice_ClientABC_July2025.pdf
- Add tags or categories in supported apps
- Group related scans into labeled folders for future reference
❌ 7. Scanning at an Angle (Tilted Phone Position)
Holding your phone at an angle while scanning causes:
- Crooked edges
- Blurry text
- Poor OCR detection
- Uneven lighting
✅ Fix:
- Hold your phone directly above the document
- Use a stand or tripod for perfect alignment
- Enable “Auto Align” in your scan app (if available)
❌ 8. Ignoring Multi-Page Mode for Longer Documents
Some users scan one page at a time and save each as a separate file.
This creates clutter and makes the documents hard to manage.
✅ Fix:
Use Batch or Multi-Page Mode to:
- Scan multiple pages in one session
- Merge into a single, organized PDF
- Reorder pages before final save
❌ 9. Sharing Unprotected or Sensitive Files Publicly
Sending sensitive scans over unsecured apps or public links is a major privacy risk.
✅ Fix:
- Add passwords to confidential PDFs
- Share using secure cloud links with expiration dates
- Use encrypted folders for storing medical, legal, or financial documents
✅ Avoid These Scanning Mistakes and Scan Like a Boss
Let’s recap the top scanning mistakes to avoid:
| ❌ Common Mistake | ✅ Fix It With This Tip |
| Scanning in poor lighting | Use natural light or a diffused LED lamp |
| Using camera app instead of scan app | Download a dedicated scan app |
| Skipping cropping or enhancement | Always preview, crop, and enhance |
| Saving scans to gallery | Sync to cloud storage |
| Not using OCR | Enable OCR in scan settings |
| Poor file names | Use clear, searchable naming |
| Holding phone at an angle | Scan from directly above |
| Saving multi-page files separately | Use batch/multi-page scan mode |
| Sharing without protection | Use passwords and encrypted cloud links |
⚡ Take Control of Your Scanning Workflow
You’ve learned what NOT to do — now it’s time to scan smarter and cleaner than ever before.
👉 Install a trusted scan app now, apply these pro tips, and avoid the common mistakes that hold others back.
🎯 Don’t just scan — scan like a professional.
FAQs – Your Top Questions About Scanning Documents with Your Phone Answered ❓
Got questions about how to scan documents with phone the right way?
Whether you’re a student, remote worker, small business owner, or just looking to go paperless, this FAQ section answers the most common concerns — fast.
Let’s dive into the top questions users are asking.

❓Q1: Can I scan documents using my phone without installing a separate app?
✅ Yes, you can — but with limitations.
On Android, you can use the Google Drive app’s built-in scanner.
Just open Drive > tap the + (plus) > choose Scan, and point your camera.
For iPhone users, the Notes app includes a simple document scanner.
However, these basic tools lack:
- OCR (text recognition)
- Cloud auto-organization
- Advanced editing and filters
📌 Pro Tip: For best results, install a dedicated scan app like Adobe Scan, Microsoft Lens, or Genius Scan.
❓Q2: Which is the best scan app for both Android and iOS?
There are several best scan apps that work seamlessly on both platforms.
Here are the top-rated options:
- Adobe Scan – Best for OCR and professional use
- Microsoft Lens – Best for Office and school work
- CamScanner – Great for batch scanning and business
- Genius Scan – Excellent privacy and offline scans
- Google Drive (Android) – Built-in, free & simple
✅ Choose based on your use case — see our full app comparison section above.
❓Q3: Are scans from a phone as good as those from a traditional scanner?
In most cases — yes, absolutely!
With today’s phone cameras and scan apps:
- Edge detection is precise
- Filters clean up backgrounds
- OCR makes text editable
- Exports match industry formats (PDF, JPG)
📌 For general documents, contracts, receipts, and notes — a smartphone scan is more than good enough.
However, for very high-resolution needs (like photo archiving or artwork scans), a flatbed scanner may still offer better quality.
❓Q4: How do I scan multiple pages into one file?
Most apps offer a multi-page scan mode or batch scanning feature.
Here’s how:
- Open your scan app
- Scan page 1
- Tap “Add Page” or “+”
- Repeat for all pages
- Export as a single multi-page PDF
✅ Apps like Adobe Scan, CamScanner, and Microsoft Lens make this super easy.
❓Q5: Can I scan documents in different languages?
Yes, but it depends on whether the app supports multi-language OCR.
Apps like Adobe Scan, Microsoft Lens, and CamScanner allow you to:
- Choose your preferred OCR language
- Scan documents in Spanish, French, Chinese, Arabic, etc.
- Extract editable text in that language
✅ Be sure to set the correct language in your scan settings for better accuracy.
❓Q6: Are free scan apps safe to use?
Mostly yes — but be cautious.
Free scan apps from trusted developers like:
- Adobe
- Microsoft
- The Grizzly Labs (Genius Scan)
- Google
are safe and reliable.
⚠️ But avoid lesser-known apps with:
- Poor reviews
- Too many ads
- No privacy policy
- Asking for unnecessary permissions
✅ Pro Tip: Use offline mode or apps with end-to-end encryption for confidential files.
❓Q7: How can I make my scans look sharper and more professional?
To improve scan quality:
- Use natural or LED lighting
- Clean your phone’s lens
- Scan on a dark, flat surface
- Enable auto-enhance or filter modes
- Always preview before saving
✅ See our full Pro Tips to Improve Scanning Quality section above for a complete checklist.
❓Q8: What format should I save my scans in — PDF or JPG?
📄 Use PDF when:
- Scanning multi-page documents
- Creating contracts, reports, forms
- Needing searchable text (OCR)
🖼️ Use JPG when:
- Scanning photos, ID cards, or receipts
- Needing lightweight file size
- Uploading to forms or websites
✅ Most scan apps let you choose both formats.
❓Q9: Where should I store my scanned documents?
Always store scans in secure cloud storage, such as:
- Google Drive
- Dropbox
- iCloud
- OneDrive
Organize them into folders (e.g., “2025 Receipts”, “Client Contracts”) and back them up regularly.
📌 Enable auto-sync to avoid losing files if your phone is lost.
❓Q10: How do I share a scanned document securely?
To share safely:
- Export as a PDF
- Use cloud links with expiration dates
- Add a password (available in apps like CamScanner or Genius Scan)
- Avoid sending sensitive scans via unencrypted channels like open messengers
✅ Always double-check file contents before sending — especially when sharing ID scans or contracts.
🎯 Have More Questions?
If you’re wondering about other scanning features, security, or professional use-cases…
👉 Drop your questions in the comments section (or contact us) and we’ll help you scan smarter, faster, and better!
Conclusion – Go Paperless and Boost Productivity with Pro Scanning Tips ✅
In today’s fast-paced digital world, knowing how to scan documents with phone isn’t just a convenient trick — it’s a powerful productivity skill.
Whether you’re a student submitting assignments, a business owner managing receipts, or a remote worker sharing contracts — your phone can now replace bulky, outdated scanners completely.

You’ve learned how to:
- Use the best scan apps for Android and iOS
- Scan docs with phone using professional techniques
- Improve scan quality with lighting, alignment, and filters
- Organize, store, and share files with cloud integration
- Avoid common mistakes and protect your sensitive documents
- Make the most out of OCR, multi-page scans, and advanced features
📌 No more wasting time with clunky scanners or emailing yourself photos.
Your smartphone is now your digital scanner, document manager, and filing cabinet — all in one pocket-sized device.
🚀 It’s Time to Take Action – Start Scanning Smarter Today
Don’t wait another day to boost your productivity and simplify your workflow.
👉 Download one of the best scan apps now and try scanning a document from your desk, wallet, or file folder — it takes less than 60 seconds!
🎯 Go paperless. Stay organized. Work smarter.
The power is already in your hand — now it’s time to use it like a pro.
💡 Want More?
✅ Bookmark this guide for future reference.
✅ Share it with friends, coworkers, or clients who need a better way to handle paperwork.
✅ Explore more of our smart mobile productivity guides coming up next!
You might also like :