
Transferring Data to a New Phone
Switching to a new phone is an exciting milestone. Whether you’re upgrading to the latest flagship device, transitioning to a different operating system, or simply replacing an older model, the process often brings a sense of fresh possibilities.
However, one crucial step can feel overwhelming: how to transfer data to a new phone. This process involves moving your valuable content—contacts, photos, messages, apps, and more—from your old device to your new one seamlessly and securely.
In today’s digital age, your smartphone is more than just a device. It’s your personal assistant, photo album, entertainment hub, and, in many cases, your office. Losing data during a phone upgrade is not an option for most people.
Thankfully, with modern advancements in technology, transferring data has become much simpler and more efficient. From cloud-based backups to direct cable connections, there are multiple ways to ensure your transition is hassle-free.
This guide covers every aspect of data migration, answering common questions and walking you through the process step-by-step. Whether you’re transferring from Android to Android, iPhone to iPhone, or even between platforms, you’ll learn how to retain all your essential data without missing a beat.
Why Is Proper Data Transfer Important?
Imagine starting fresh with a new phone only to realize that your cherished memories, saved Wi-Fi passwords, or work files didn’t make it over.
A poorly executed transfer can lead to frustrating setbacks like lost photos, missing contacts, or the inconvenience of re-downloading apps and resetting accounts.
Following the right steps ensures not only the preservation of your data but also the functionality and continuity of your daily life.
What This Guide Offers
This article is your ultimate resource for learning how to transfer data effectively. Inside, you’ll find:
- Detailed instructions tailored to Android and iPhone users.
- Solutions for both wired and wireless transfers.
- Tips for handling large files, encrypted backups, and secure transfers.
- Recommendations for the best apps and tools to make the process even smoother.
We’ve included strategies for various scenarios, such as switching between different operating systems, handling broken phones, and recovering data from older backups. Additionally, this guide is updated with the latest methods and tools to ensure you’re getting accurate and relevant information.
The Benefits of Using Modern Data Transfer Methods
- Convenience: Tools like Google Backup, iCloud, and proprietary apps like Samsung Smart Switch eliminate the need for manual transfers.
- Security: Advanced encryption ensures that your data stays private during the process.
- Comprehensiveness: From call logs to app settings, everything can be moved effortlessly when the correct steps are followed.
No matter the method you choose, this guide will help you make informed decisions so that your data transfer is smooth and stress-free. Ready to learn how to transfer data to a new phone effortlessly? Let’s dive in!
Before proceeding, make sure your current device is backed up using the best tools.
1. Preparing for the Data Transfer
A successful data transfer requires careful preparation to avoid any potential issues. By taking these essential steps before initiating the process, you can ensure that your transition to a new phone is smooth and stress-free. Here’s what you need to do:
1.1 Backup Your Data Thoroughly
The first step in learning [how to transfer data to a new phone] is ensuring your current data is securely backed up. This backup acts as a safeguard against accidental loss and makes the transfer process much easier.
For Android Users:
- Open Settings > Google > Backup and Restore.
- Turn on Back up to Google Drive to save your app data, contacts, and settings.
- Use apps like Google Photos to back up your pictures and videos automatically.
For iPhone Users:
- Go to Settings > [Your Name] > iCloud > iCloud Backup.
- Tap Back Up Now. Ensure you’re connected to Wi-Fi for a faster process.
- Consider using an external storage device if your iCloud storage is full.
Tips for Backups:
- Double-check that all essential data, such as contacts, photos, messages, and app settings, are included.
- Always verify your backup is complete before moving to the next step.
1.2 Check Compatibility Between Devices
Not all phones and operating systems are equally compatible. Ensuring your devices are capable of sharing data is crucial.
- For Android to Android: Most Android phones work seamlessly using Google Backup or proprietary tools like Samsung Smart Switch.
- For iPhone to iPhone: Apple’s Quick Start feature ensures a smooth transfer.
- For Switching Platforms: Tools like “Move to iOS” or “Switch to Android” simplify the process of moving data across platforms.
Pro Tip: Check if your apps and purchased content are compatible with the new phone’s OS. Paid apps often need to be re-purchased when switching between Android and iOS.
1.3 Ensure Both Devices Are Fully Charged
Interruptions during a transfer can corrupt your data or force you to start over. This is why keeping your phones charged is non-negotiable.
- Aim for at least 80% battery on both devices before starting.
- For extended processes, consider plugging your phones into a charger to avoid interruptions.
1.4 Gather Necessary Cables and Adapters
Depending on your devices, different cables or adapters may be required to establish a connection.
- USB-C or Lightning Cables: Most newer phones use USB-C or Lightning connections for direct transfers.
- OTG Adapters: For older devices, you may need an OTG (On-The-Go) adapter to link the phones directly.
- Wireless Methods: If cables are unavailable, apps like Google Drive, OneDrive, or AirDrop are effective alternatives.
Checklist for Hardware:
- Check if your new phone includes a transfer cable in the box.
- Invest in a high-quality OTG adapter if needed for older models.
1.5 Update Your Software and Apps
Outdated operating systems or apps can cause errors during the transfer process.
- Go to your phone’s Settings > System > Software Update and ensure both devices are running the latest OS version.
- Update all critical apps to ensure compatibility with your new phone.
Why Updates Matter:
- Bug fixes in updates improve connectivity between devices.
- Compatibility with third-party apps for data transfer is usually enhanced in newer versions.
1.6 Organize and Declutter Your Data
Before moving your files, take the time to organize your data. This will save storage space on your new phone and improve usability.
- Delete unnecessary files, duplicate photos, or unused apps.
- Use tools like Google Files or iCloud Storage Manager to clean up your storage efficiently.
- Create folders for better file management on your new phone.
Quick Tips for a Successful Start
- Ensure you have access to your login credentials for services like Google, iCloud, and email accounts.
- Consider setting up two-factor authentication (2FA) on your new phone for added security after the transfer.
- Take a screenshot of important settings on your old phone for reference later.
By thoroughly preparing for the process, you’ll make the actual data transfer seamless and stress-free. This foundation is crucial when tackling the question of how to transfer data to a new phone] with ease.
2. Transferring Data Between Android Phones
Upgrading to a new Android phone can be seamless if you use the right methods. Here, we explore multiple ways to ensure a complete and hassle-free transfer of your data, apps, and settings. Whether you rely on cloud services, cable connections, or dedicated apps, these step-by-step instructions will simplify the process.
Using Google Backup
One of the easiest and most reliable methods to transfer data to your new Android phone is by using Google Backup. Here’s how:
- Enable Google Backup on Your Old Phone:
- Open Settings on your current Android phone.
- Navigate to Google > Backup.
- Toggle on the option for Back up to Google Drive.
- Ensure essential items like photos, contacts, app data, and device settings are included.
- Tip: Set your backup to “High Quality” to save storage space on your Google account.
- Restore Data on Your New Phone:
- Turn on your new phone and follow the initial setup prompts.
- When asked, log in with the same Google account used on your old phone.
- Select the option to Restore from Backup and choose your recent backup file.
- Pro Insight: This method automatically transfers Wi-Fi passwords, app data, and call history, making it convenient for a full restoration.
- Advantages of Google Backup:
- Completely wireless and no cables needed.
- Restores data across multiple Android versions.
- Works as a built-in feature without third-party apps.
Using a Direct Cable Connection
If you prefer a faster and more direct approach, using a cable to transfer data can be highly efficient. This method is ideal for transferring large files like videos and music. Here’s how to do it:
- Prepare the Necessary Cable:
- Most modern Android phones use USB-C to USB-C cables.
- For older models, you might need a USB-A to USB-C or an OTG adapter.
- Connect Both Devices:
- Plug one end of the cable into your old phone and the other end into your new phone.
- Ensure both devices are turned on and unlocked.
- Start the Transfer:
- On your new device, follow the setup prompts and select the option to Copy Apps & Data.
- Confirm the connection between the phones and allow the transfer to begin.
- Customize What You Transfer:
- Most Android devices let you pick what to move — such as contacts, photos, music, and app data.
- For a clutter-free start, uncheck items you no longer need.
- Pro Tip: This method doesn’t rely on the internet, making it perfect for areas with poor connectivity.
Via Smart Switch for Samsung Phones
If you’re switching to a Samsung phone, the Smart Switch app offers a tailored experience. Here’s how to use it:
- Install Smart Switch:
- Download the app on both your old and new devices from the Google Play Store.
- Choose Transfer Type:
- Open the app and select Send Data on your old phone and Receive Data on the new phone.
- Pick between wireless transfer or cable transfer for faster speeds.
- Select Data to Transfer:
- The app allows you to migrate everything from contacts and text messages to photos, videos, and even app layouts.
- For specific data types (e.g., WhatsApp chats), follow the app’s instructions for third-party backups.
- Initiate the Transfer:
- Once connected, confirm your selection and let the app handle the rest.
- Depending on the file size, the process may take anywhere from a few minutes to an hour.
- Why Use Smart Switch?
- Retains your home screen setup for an identical look.
- Compatible with non-Samsung Android phones, making it versatile.
- Transfers even calendar events and alarm settings.
- Quick Hook: Planning to switch to Samsung? Make sure you take advantage of Smart Switch for an effortless data transfer experience!
Why These Methods Work Best
Each method offers unique advantages. Google Backup is perfect for those who prioritize convenience and accessibility, while cable connections ensure a fast, offline transfer. Samsung’s Smart Switch, on the other hand, excels at creating a seamless transition for its users. Whichever route you choose, you’re just a few taps away from enjoying your new phone with all your important data intact.
Don’t let data transfer hold you back from exploring your new phone! Use these methods to ensure a smooth transition and start enjoying your upgraded device today.
Would you like to learn how to transfer data between different platforms like Android and iPhone? Click here for our full guide!
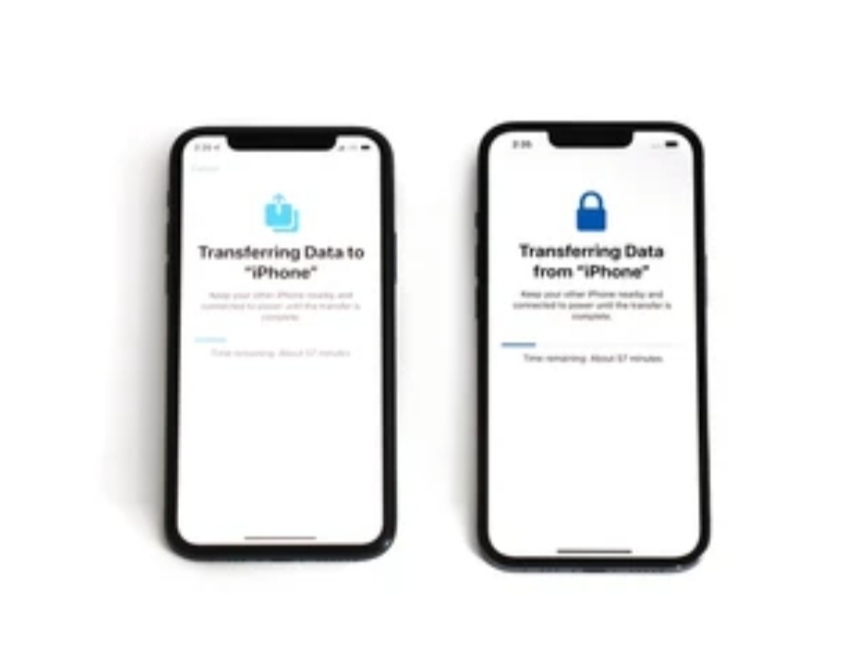
3. How to Transfer Data Between iPhones
Switching to a new iPhone is a seamless process thanks to Apple’s user-friendly tools. Whether you’re setting up a device for the first time or migrating from an older iPhone, Apple offers multiple ways to make the process efficient. Here’s how to transfer your data safely and effectively:
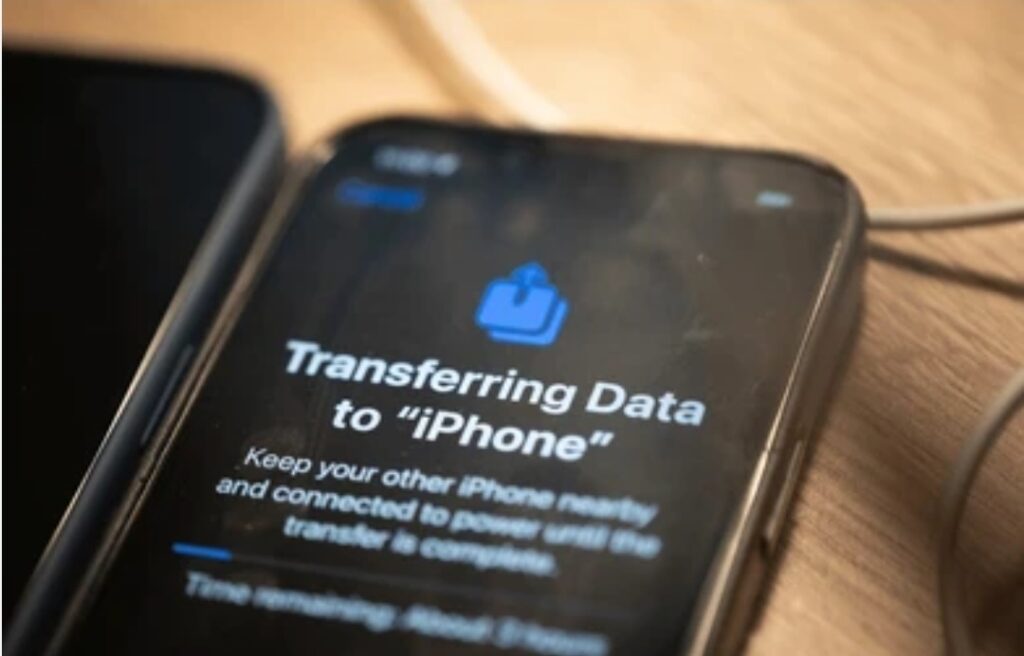
Using Quick Start for a Hassle-Free Transfer
Quick Start is the most straightforward method to transfer data between iPhones. It uses a combination of wireless technology and iCloud to move your information quickly.
- Keep Both Devices Nearby:
- Place your old iPhone and your new iPhone close to each other. Ensure both devices have sufficient battery or connect them to chargers to avoid interruptions during the process.
- Follow On-Screen Prompts:
- Turn on your new iPhone, and a setup prompt will appear on your old device. Tap Continue and use the old iPhone’s camera to scan the animation on the new one. This pairs the devices securely.
- Select Data Transfer Option:
- You will be prompted to transfer data directly or restore it via iCloud.
- For a direct transfer, ensure both phones stay connected and nearby. This method is faster but requires stable connections.
- Verify Your Apple ID and Settings:
- Confirm your Apple ID credentials to begin the transfer. You’ll also be asked to set up Face ID or Touch ID on the new device.
- Let the Transfer Complete:
- Depending on the volume of data, the process can take a few minutes to an hour. Keep both devices connected and avoid interruptions. Once finished, your new iPhone will mirror your old one with all apps, settings, and personal data intact.
Restoring from iCloud Backup
If you’ve already backed up your old iPhone to iCloud, restoring your data is straightforward during the new device setup.
- Create a Fresh Backup:
- On your old iPhone, go to Settings > [Your Name] > iCloud > iCloud Backup.
- Tap Back Up Now to ensure all recent changes are saved.
- Check that all essential data, like photos, messages, and app settings, are included in the backup.
- Set Up Your New iPhone:
- Turn on your new iPhone and follow the on-screen setup instructions. Connect to a Wi-Fi network when prompted.
- Choose Restore from iCloud Backup:
- On the Apps & Data screen, select Restore from iCloud Backup.
- Log in with your Apple ID, and choose the most recent backup from the list.
- Complete the Restoration Process:
- The restoration will begin, and your phone will download all backed-up data from iCloud. This process might take longer if your backup is large or your internet connection is slow.
- Additional Downloads:
- After the initial restoration, apps and media will download in the background. Make sure your phone stays connected to Wi-Fi during this time.
Which Method Should You Choose?
Both Quick Start and iCloud backups are effective, but your choice depends on specific circumstances:
- Use Quick Start if both devices are available, and you want a faster transfer.
- Choose iCloud Backup if your old phone is unavailable or if you’ve already backed up to iCloud.
Pro Tips for a Smooth Transfer
- Check Storage Space: Ensure your iCloud account has enough storage for the backup. Upgrade your plan if necessary to avoid issues.
- Update Both Devices: Keep your old and new iPhones updated to the latest iOS version to prevent compatibility issues.
- Disable Find My iPhone: For specific transfers, you may need to turn off Find My iPhone temporarily.
- Secure Your Data: Always use a secure Wi-Fi network to avoid data breaches during the transfer.
Switching to a new iPhone has never been easier. By following these simple steps, you can effortlessly move all your important data to your new device. Don’t wait—start your transfer today and explore the full potential of your new iPhone!
4. Switching Between Android and iPhone
When transitioning between Android and iPhone, data migration can be a challenge due to differences in operating systems. However, tools like “Switch to Android” and “Move to iOS” make the process seamless. Below, we’ll provide step-by-step instructions for each direction of transfer.
Moving from iPhone to Android
Switching from an iPhone to Android involves a few additional steps, especially since Apple and Google systems handle data differently. Here’s how to make the process stress-free:
- Prepare for the Transition
- Disable iMessage: Go to Settings > Messages on your iPhone and toggle off iMessage. This ensures you don’t miss messages from your contacts after switching to Android.
- Turn Off FaceTime: Similarly, go to Settings > FaceTime and disable it. This avoids interference with call notifications.
- Backup Your Data to iCloud: Before transferring, back up all your iPhone data to iCloud. This serves as a safety net.
- Download and Use the “Switch to Android” App
- Go to the App Store on your iPhone and download [Switch to Android].
- This app allows you to transfer essential data such as contacts, photos, videos, and even calendar events to your Android device wirelessly.
- Follow the app’s prompts to connect both devices.
- Transfer Data Wirelessly or Using a Cable
- If your Android phone supports it, you can connect both devices using a Lightning to USB-C cable or adapter for a faster transfer.
- Alternatively, use the wireless transfer option in the “Switch to Android” app. Ensure both phones are on the same Wi-Fi network for optimal performance.
- Sync Your Google Account
- After transferring, log into your Google account on your new Android phone. Sync your Gmail, Google Calendar, and Google Photos to integrate seamlessly with your new device.
- Migrate Additional Data
- Apps: Download Android versions of your favorite iPhone apps from the Google Play Store.
- WhatsApp Chats: Use the WhatsApp Chat Migration feature to move chats and media from your iPhone to Android.
Moving from Android to iPhone
Transferring from Android to iPhone is straightforward, thanks to Apple’s “Move to iOS” app. Follow these steps for a smooth transition:
- Download the “Move to iOS” App
- Go to the Google Play Store on your Android phone and install the [Move to iOS app].
- This app supports transferring contacts, message history, photos, videos, email accounts, and calendar events to your iPhone.
- Set Up Your New iPhone
- During the initial setup, choose the Move Data from Android option when prompted.
- On your Android device, open the app and enter the unique code displayed on your iPhone.
- Transfer Data Wirelessly
- Both devices will establish a private Wi-Fi network to transfer data securely.
- Follow the on-screen instructions to select the data you wish to move, such as contacts, photos, and saved bookmarks.
- Verify Your Data on iPhone
- After the transfer completes, check your iPhone to ensure all data has been migrated successfully.
- Download iOS versions of your favorite apps and log into your accounts.
- Additional Tips for a Smooth Transition
- Email Setup: Add your Gmail or other email accounts in the iPhone’s Mail app.
- WhatsApp Chat Transfer: Use WhatsApp’s migration feature for Android-to-iPhone transfers.
Important Considerations
- Cloud Storage Services: Platforms like Google Drive and Dropbox can store additional files during the transfer. Upload your documents, music, and other files for easy access across devices.
- Keep Both Devices Updated: Ensure both your Android and iPhone have the latest OS updates installed. Compatibility issues can arise with outdated software.
- Double-Check App Availability: Not all Android apps have iOS counterparts and vice versa. Look for similar alternatives if needed.
Switching between Android and iPhone can feel daunting, but with these steps, you can confidently answer the question, “How to transfer data to a new phone?”. Whether you’re moving photos, contacts, or apps, the right tools ensure that nothing important gets left behind.
5. Using Third-Party Apps for Data Transfer
When traditional methods like cloud backups or direct cables don’t fit your situation, third-party apps offer convenient solutions. These apps are particularly helpful when you’re transferring data between incompatible platforms, such as Android to iPhone, or if you want a quick, cable-free option for moving files.
Here’s a deeper look at how to use these tools effectively.
Why Use Third-Party Apps for Data Transfer?
Third-party apps are versatile, allowing you to transfer data wirelessly or with minimal setup. They’re ideal for sharing:
- Photos and Videos
- Music Files
- Contacts
- Documents
- Large Files
These apps work across platforms, making them a reliable option for those wondering [how to transfer data to a new phone] when traditional methods don’t work.
Popular Third-Party Apps for Data Transfer
Here are some of the best options available, their features, and how to use them:
1. SHAREit
Overview: SHAREit is a well-known app for transferring large files quickly between devices. It works on Android, iOS, Windows, and Mac.
How to Use SHAREit:
- Download SHAREit on both your old and new devices.
- Connect both devices to the same Wi-Fi network.
- On the old device, select the files you want to transfer and tap Send.
- On the new device, open SHAREit and tap Receive.
Advantages:
- Fast file transfers.
- No internet required after setup.
2. Xender
Overview: Xender offers seamless data transfer between phones and even PCs. It’s an excellent choice for sharing multiple types of files at once.
How to Use Xender:
- Install Xender on both devices.
- Open the app and select Create Connection.
- On the receiving phone, tap Join Connection.
- Select files on your old phone and send them to the new one.
Unique Features:
- Supports multi-platform transfers.
- No file size limitations.
3. Send Anywhere
Overview: This app prioritizes security, offering encrypted transfers through unique codes. It’s perfect for sensitive files.
How to Use Send Anywhere:
- Install the app on both phones.
- Choose files on the old device and select Send.
- Enter the 6-digit code displayed on the new device to initiate the transfer.
Why Choose It:
- High-level security for your data.
- Works without requiring the same Wi-Fi network.
Tips for Using Third-Party Apps Effectively
- Check Compatibility: Ensure both devices support the app you choose.
- Connect to Stable Wi-Fi: For larger files, a strong network ensures faster transfer speeds.
- Follow Instructions Carefully: Apps like Send Anywhere may require additional authentication steps.
- Test Before Full Transfer: Transfer a small file first to confirm the process is working correctly.
When Should You Use These Apps?
If you’re switching platforms, such as Android to iOS, or transferring specific file types not included in native backup solutions, these apps are invaluable. They’re also a good choice for users with:
- Limited cloud storage.
- No access to USB cables or adapters.
- Privacy concerns about using cloud services.
Final Thoughts
Third-party apps like SHAREit, Xender, and Send Anywhere simplify how to transfer data to a new phone, especially in complex scenarios. By following the steps above, you can ensure your files are moved quickly, securely, and without hassle.
6. FAQs on Phone Data Transfers
Switching phones raises a lot of questions, especially if you’re transferring data for the first time. Below, we’ve compiled some of the most common questions about how to transfer data to a new phone and provided detailed answers to make the process as simple as possible.
Q1: Can I transfer all my data, including apps, settings, and passwords?
Yes, you can transfer almost all your data, including apps, settings, and saved passwords, using cloud backups or direct transfer tools provided by Android and iOS.
- For Android Devices: Use Google Backup to sync app data, Wi-Fi passwords, and settings. When setting up your new phone, log in with the same Google account and select Restore from Backup.
- For iPhones: iCloud or Quick Start will transfer app layouts, settings, and even some saved passwords.
However, some data, like app-specific logins or offline app data, may require manual re-entry.
Q2: How do I transfer WhatsApp chats to my new phone?
Transferring WhatsApp chats requires specific steps, depending on your device:
- Android to Android: Use Google Drive backup. Go to WhatsApp > Settings > Chats > Chat Backup and ensure you back up your data. On your new phone, log into the same Google account and restore the backup during WhatsApp setup.
- iPhone to iPhone: Use iCloud backup through WhatsApp settings. During setup on the new device, select Restore Chat History.
- Switching Platforms: Use WhatsApp’s official tool for transferring between Android and iPhone, available in the app’s settings.
Pro Tip: Always ensure the phone number linked to WhatsApp remains active during the process.
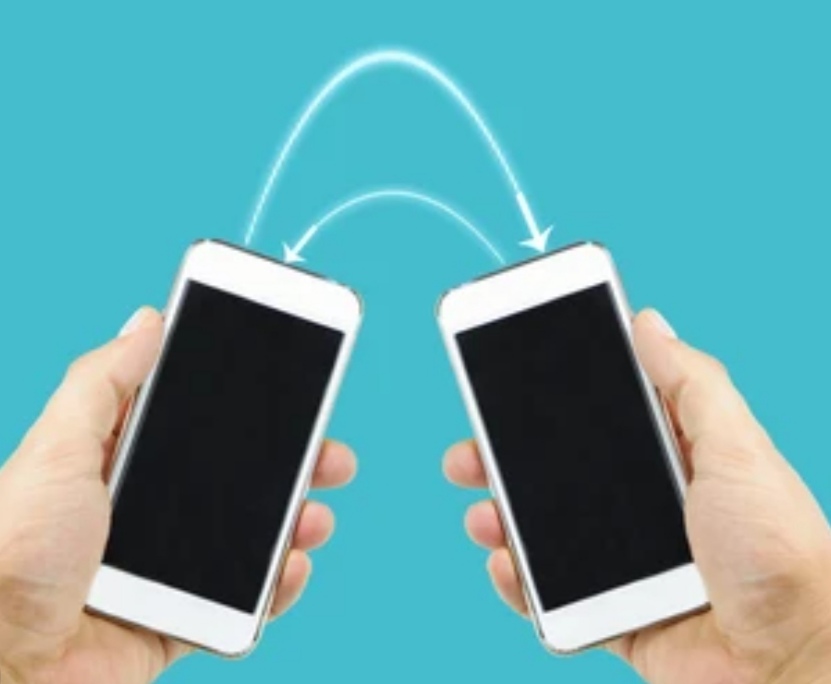
Q3: Is it possible to transfer data wirelessly without cables?
Absolutely! Both Android and iOS offer wireless options:
- For Android: Use the “Switch to Android” app or Nearby Share.
- For iPhone: Quick Start works seamlessly over Wi-Fi.
These options are convenient, especially if you don’t have the necessary cables on hand. However, wireless transfers may take longer than direct connections.
Q4: What should I do if my old phone is broken or lost?
Even if your old phone is inaccessible, your data can still be retrieved using cloud backups:
- For Android Users: Access your Google account to restore data during your new phone’s setup.
- For iPhone Users: Log into your iCloud account and choose Restore from Backup during setup.
Note: Regular backups are crucial for situations like this. Set up automatic backups to avoid losing important data in the future.
Q5: Will my photos and videos transfer at full quality?
It depends on the transfer method:
- Using Cloud Services: Google Photos and iCloud often compress images unless you select Original Quality (requires more storage space).
- Direct Transfers: Using cables or local apps ensures no loss in quality.
For high-quality transfers, ensure settings like Upload Quality in Google Photos or iCloud are adjusted to their highest levels.
Q6: What is the fastest method to transfer data to a new phone?
Using a direct cable connection is usually the fastest option as it doesn’t depend on Wi-Fi speed.
- For Android: Use a USB-C to USB-C or USB-C to Lightning cable and follow the setup instructions.
- For iPhone: Quick Start combined with a Lightning cable is incredibly quick.
Q7: Can I transfer data from multiple phones to one device?
Yes, but you’ll need to merge the data manually. For example:
- Transfer contacts from one phone using Google Contacts or iCloud.
- Sync photos from both devices using a shared cloud account.
However, app data or settings from two phones cannot typically be merged automatically.
Q8: Are there any risks involved in transferring data?
While the process is generally safe, there are a few risks:
- Incomplete Transfers: Interruptions during transfer (like low battery or unstable Wi-Fi) can result in missing data.
- Privacy Concerns: Ensure you’re using official tools or apps to avoid potential data breaches.
- Duplicate Data: Using multiple transfer methods can sometimes create duplicates, especially with contacts or photos.
To minimize risks, always back up your data before transferring.
Q9: Can I transfer data to a phone with a smaller storage capacity?
Yes, but you’ll need to manage your data carefully:
- Delete unnecessary apps or files from your old phone.
- Use cloud services for large files like photos and videos instead of storing them locally.
Most phones allow selective transfers, so you can prioritize what’s essential.
Q10: What should I do if the transfer process fails?
Here’s a quick troubleshooting checklist:
- Restart Both Devices: A simple reboot often resolves connection issues.
- Check Cable/Adapter Connections: Ensure everything is securely plugged in.
- Update Software: Outdated apps or OS versions can cause compatibility issues.
- Try an Alternate Method: Switch from wireless to cable transfer or vice versa.
If the problem persists, consult your device’s official support page for more help.
Final Thoughts on FAQs
Understanding [how to transfer data to a new phone] is essential to make your transition seamless. Whether you’re using direct transfers, cloud backups, or apps, this guide ensures your data stays safe and accessible.
7. Conclusion and Final Tips
Transferring data to a new phone can seem daunting at first, but with the right approach, it becomes a seamless process. Here’s a more detailed overview and actionable tips to ensure success while safeguarding your data:
Plan Ahead Before Starting the Transfer
One of the keys to success when learning [how to transfer data to a new phone] is preparation. Keep these points in mind before starting:
- Backups Are Your Safety Net: Even with advanced tools, there’s always a slight risk of data loss. Back up your old phone to Google Drive, iCloud, or an external storage device before transferring. This step ensures you have a copy of your important data.
- Verify App and Account Access: Ensure that you know the login credentials for all your accounts, including social media, email, and cloud storage. Many apps won’t work on your new phone without a successful login.
Double-Check Your Data After the Transer
Once the transfer process is complete:
- Open key apps like Contacts, Photos, and Messages to confirm that all critical data has been successfully moved.
- If something seems missing, revisit the transfer tool you used or retrieve specific files manually from your backup.
Choose the Best Transfer Method for Your Situation
The right transfer method depends on the devices you’re using:
- Sticking to the Same Platform: Transfers between Android devices or iPhones are often faster and more complete because the systems are designed to sync seamlessly. Tools like Google Backup and iCloud make it easy.
- Switching Platforms: Moving from Android to iPhone or vice versa might require additional tools like Move to iOS or Switch to Android. Be patient, as cross-platform transfers might take a bit longer.
Don’t Forget Your Apps and Preferences
Modern phones allow you to bring over not just data but also settings and preferences:
- Android Users: Use Google’s account sync to transfer home screen layouts, app settings, and Wi-Fi passwords.
- iPhone Users: Quick Start or iCloud restores your settings, wallpaper, and saved app logins.
If some apps don’t migrate automatically, download them manually from the App Store or Google Play.
Additional Security Tips During Transfers
Security is critical when handling sensitive data during a phone migration. Follow these tips to stay protected:
- Disable Old Accounts: Once the transfer is complete and you’ve confirmed everything is working on your new phone, sign out of your accounts on the old device.
- Reset Your Old Device: To protect your personal data, perform a factory reset on your old phone before selling, donating, or recycling it.
- Encrypt Your Backups: If you’re using an external hard drive or SD card, encrypt the backup to keep your information safe.
Explore New Features on Your Phone
After successfully transferring your data, take some time to explore the features of your new phone:
- Modern devices often come with advanced camera modes, gesture controls, or enhanced multitasking features.
- If you’re switching platforms, familiarize yourself with the differences in settings and customization. For example, [learning the shortcuts on iPhone’s iOS] can significantly improve your user experience.
When to Seek Professional Help
In some cases, transferring data may be too technical or time-consuming:
- If you encounter issues like corrupted files, missing contacts, or incompatible apps, professional support services provided by your phone manufacturer or a local technician can be a lifesaver.
- Some retailers even offer free data transfer services when you purchase a new device.
Final Thoughts: How to Transfer Data to a New Phone Like a Pro
Mastering [how to transfer data to a new phone] is all about preparation, patience, and using the right tools. Whether you’re upgrading to the latest flagship device or switching platforms for the first time, the methods outlined in this guide ensure your personal data is safe and accessible.
Remember: Backing up your data is always a priority, and choosing the correct transfer method makes the entire process smoother.
You might also like :